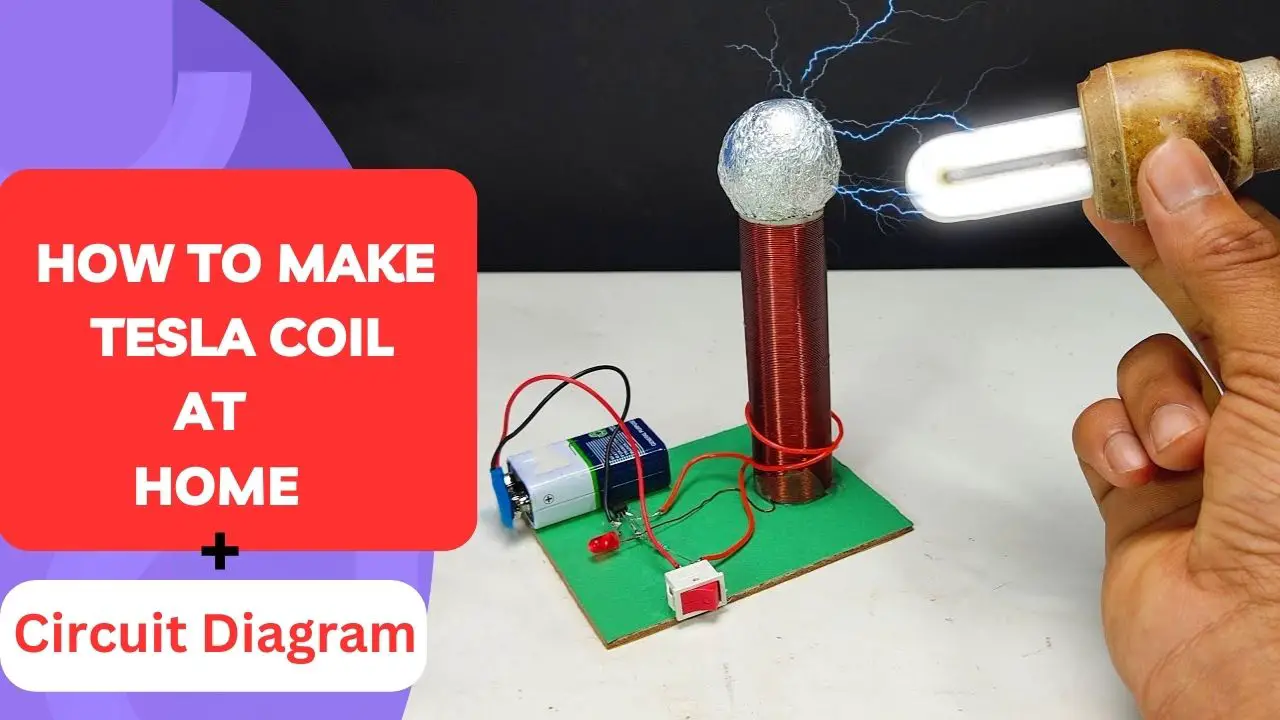
How to Build Mini Tesla Coil at your home for a science project.
This is an amazing project that you must try to make that teaches you more concepts of physics and electronics.
In this post we will see how to make a Tesla coil in a simple way, I have also given mini Tesla coil circuit diagram
Tip: You might also like our post on DC Boosters
A few things to know about Tesla Coil
In the world of electronics and DIY projects, the Tesla coil stands as an iconic creation that bridges science, technology, and art.
This post provides step-by-step instructions for building a small Tesla coil using readily available components.
By combining the principles of electromagnetic resonance and high-frequency oscillation, you can create the groundbreaking invention of Nikola Tesla’s most widely known experiment.
Components required for making Small Tesla Coil
Before learning How to build Mini Tesla coil, let’s go through the materials and their function in this mini Tesla coil
- 2N2222 Transistor
The transistor acts as a switch, controlling the flow of current through the primary coil and creating rapid on-off cycles that lead to high-frequency oscillation. - 22k Ohm Resistor
The resistor limits the current flowing into the base of the transistor, ensuring it operates within safe parameters. - LED Indicator
The LED visually indicates when the circuit is active, offering a clear signal of the coil’s operation. - 9V Battery
The power source for the circuit provides the energy needed to generate the electromagnetic field. - Switch
A simple component that allows you to turn the circuit on and off. - 22-gauge Insulated Copper Wire
This wire is used to wind the primary and secondary coils of the Tesla coil, facilitating the transfer of energy through electromagnetic induction. - PVC Tube
The tube serves as a foundation for winding the wire and provides structural support. - Aluminum Foil Ball
Placed at the top of the PVC tube, the aluminum foil ball becomes the “top load” and aids in the concentration of the electromagnetic field at the coil’s apex.
Building Coil for the small Tesla coil
In this phase, we will make a coil which is the main part of the Tesla coil.
Start by selecting a PVC tube of appropriate dimensions I chose 95mm and 15mm diameter. This will serve as the base structure for winding the wire.
Make sure the tube is clean and free from any dust.
To Build this I will take PVC tubes that measure 95mm and start to roll the insulated copper wire.

Take the 22-gauge insulated copper wire and begin winding it around the PVC tube as in the visuals.
It will take quite a while to complete the winding process because here we are working layer by layer.
Secure the end of the coil with insulation or clear tape, and scratch the end of the coil with emery paper.
If you don’t have emery paper you also cal expose the tip to flame it will instantly remove the insulation.
Mini Tesla coil circuit diagram
This is the circuit diagram we will be using to make this Tesla coil project.
To make this circuit understandable to everybody i will give an explanation of this circuit diagram

Mini Tesla coil circuit diagram explanation for better clarity
The 2N2222 transistor controls the flow of current through the primary coil.
Attaching the Transistor and Resistor:
Connect the 2N2222 transistor and the 22k ohm resistor to the primary coil. The resistor to the base of the transistor regulates its operation.
Winding the Secondary Coil:
Leave a gap of a few inches above the primary coil and start winding the secondary coil using the same wire. Aim for around 100-200 turns for the secondary coil. The secondary coil’s greater number of turns compared to the primary coil facilitates voltage transformation.
Connecting the LED and Battery:
Attach the LED to the circuit to indicate its operation. Connect the positive end of the LED to the positive terminal of the battery and the negative end to the collector of the transistor.
Connect the negative terminal of the battery to the emitter of the transistor.
Adding the Top Load:
Place an aluminum foil ball at the top of the PVC tube. The top load enhances the concentration of the electromagnetic field, allowing for more striking visual effects.
Finishing Touches:
Ensure all connections are secure and insulated. Double-check the circuit’s wiring to avoid any potential short circuits or safety hazards.
Soldering the components together
The 22k Ohm resistor is connected to the base of the transistor to limit the current flowing into it and control its switching while the 9V battery is the power source for the circuit.

The transistor has an emitter, base and collector and these need to be soldered accordingly to the circuit diagram.
The LED is included for indication purposes, likely to show when the circuit is powered.
The primary coil is made of insulated copper wire wound around a PVC tube. This coil is connected to the collector of the transistor.
The aluminum foil ball is placed at the top of the PVC tube and serves as a capacitance element for the Tesla coil.
To make this foil ball I have just rolled the sheet of aluminum over a plastic ball.
I will connect one end of the secondary coil to the base of this aluminum ball.

Tips for using homemade small Tesla Coil
When you switch on the circuit, the transistor’s rapid switching creates high-frequency oscillations in the primary coil.
This, in turn, induces a high-voltage, low-current electromagnetic field in the secondary coil. The field’s interaction with the top load generates stunning electrical discharges in the form of miniature lightning bolts.
It’s crucial to handle the Tesla coil with care. The voltages produced can pose a chance of electrical shock. But as our project is small there is very minimal risk.
But still for double safety operate the coil in a controlled environment and keep a safe distance from the discharges.
Why you should make homemade Tesla coil
Building a mini Tesla coil is an amazing project that merges science and creativity.
Through simple components and careful construction, you can create a fantastic display of electromagnetic phenomena.
As you explore the world of electronics and electromagnetism, With your mini Tesla coil, you’ve unlocked a window into the innovativeness of Nikola Tesla while gaining hands-on experience in the world of electrical engineering.
Want more details to feed on a research paper Check Here
This was all about How to build a Mini Tesla coil, You can watch this video for working also thanking the creator for a clean project.
As an Amazon Associate, I earn commission from qualifying purchases.