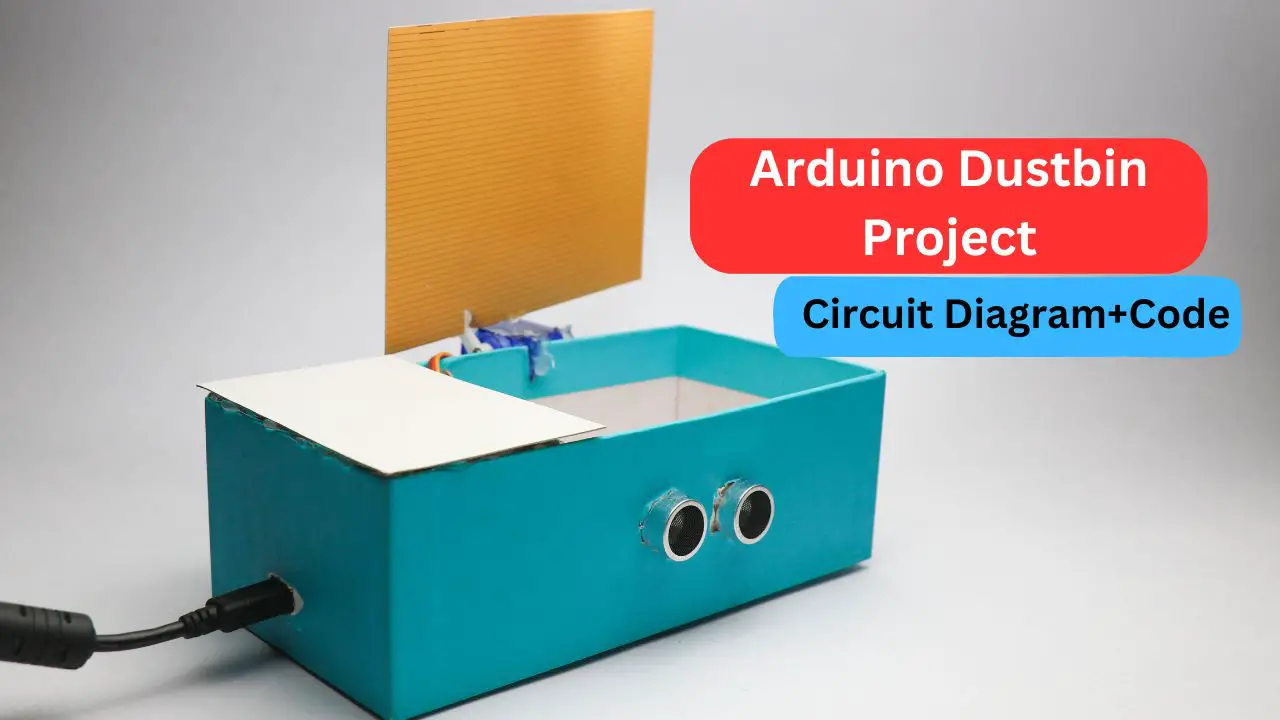
Hello readers you have thought of the right project to make, Smart Dustbin using Arduino is a useful project for your mini engineering project.
With this project, you don’t need to open and close the dustbin again and again which most people do not like.
Now you can just go near the dustbin and the lid will automatically open for you.
I built this project with an old cardboard box you can implement it on an actual big dustbin also.
In this article, I have given all the instructions along with the smart dustbin code and circuit diagram.
This article also has information on using Arduino with ultrasonic sensor.
You might also like our innovative project smart glasses for the blind
What is a Smart Arduino Dustbin
It’s a regular dustbin with automatic closing and opening of the dustbin lid.
Since we are using Arduino to achieve this function we call it a smart Arduino dustbin.
The onboard Arduino has the ultrasonic sensor also known as hcs404 and micro servo.
When an obstacle is detected by the Arduino ultrasonic sensor it makes the servo move.
This simple mechanism is used to make this project.
Supplies
- Arduino nano and breadboard
- Ultrasonic sensor
- Micro servo
- Empty cardboard box or a dustbin
- Hot glue
- Arduino programming cable and IDE

After you gather these supplies we can wear them in the next phase.
Building a circuit for this project is not a big task.
With easy explanation, I will make it even simpler
Smart Dustbin using Arduino Circuit Diagram
This is the circuit we will be doing for our project. it has two parts.
I will explain them one by one the first is with hcsr04
Ultrasonic sensor with Arduino
If you have made projects before you might have used Arduino with ultrasonic sensor.
The sensor has 4 pins, Vcc, Echo, Trig and GND.
VCC and GND to 5v, and GND of nano.
Trig pin to D2 and the echo pin to D3 of nano.
You can use jumper wires for the connections.

Now we have to connect the servo, as I’m not using an external supply instead I will use USB power from the cable.
Micro servo with Arduino
The servo I’m using here is a plastic version if you are using a big dustbin with lids.
Make sure your lid weight can be handled by this servo, if not you should go with the metal servo.
Using a metal servo makes the circuit complex and also you need an external power supply.
The servo has 3 terminals, Ground, signal, and power.
Ground and power to GND and 5v pin of nano.
Signal of micro servo to digital pin or D9 of Nano.
After you have the circuit complete we can head over and upload codes.
Smart Dustbin using Arduino Nano Code
This will be the code that we are using in our project, copy and use it on your Arduino IDE.
#include <Servo.h>   //servo library

Servo servo;
int trigPin = 2;
int echoPin = 3;
int servoPin = 9; //pin choice is yours

long duration, dist, average;
long aver[3];   //array for average

void setup() {
    servo.attach(servoPin);
    pinMode(trigPin, OUTPUT);
    pinMode(echoPin, INPUT);
    servo.write(0);         //close cap on power on
    delay(1000);
    servo.detach();
}

void measure() {
    digitalWrite(trigPin, LOW);
    delayMicroseconds(5);
    digitalWrite(trigPin, HIGH);
    delayMicroseconds(15);
    digitalWrite(trigPin, LOW);
    pinMode(echoPin, INPUT);
    duration = pulseIn(echoPin, HIGH);
    dist = (duration / 2) / 29.1;    //obtain distance
}

void loop() {
    measure();   // Measure distance

    if (dist < 5) {
        //if hand on the distance 10...15 cm
        servo.attach(servoPin);
        delay(1);
        servo.write(150);
        delay(3000);       //wait 3 seconds
        servo.write(0);
        delay(1000);
        servo.detach();
    } else if (dist < 8) {
        servo.attach(servoPin);
        delay(1);
        servo.write(150);  // Open the servo
        delay(1000);       // Wait for a short duration
        servo.write(0);    // Close the servo
        delay(1000);
        servo.detach();    // Detach the servo
    }

    delay(50);  // Delay between measurements
}
Connect the USB cable to nano and open the IDE
Paste this code, select the correct com port, and type of board.
Upload and now the project is ready for testing.
Adding the Circuit to the Dustbin
Like I said i will use a small piece of cardboard that works as a lid
If you are integrating this circuit on a large dustbin lid make sure the servo can open and close that lid.
Anyways there are multiple methods to add this mechanism this is the simple one.

Use hot glue to add the breadboard to the base.
After securing this we can work on covering the circuit by sideways and then at the top.
In the end, I will add the micro servo, you can make some changes in the code on the servo angle and delay part if you want.
I glued the lid to the servo horn poured some hot glue and left it to dry
After the glue is dry project is ready for use.
How to use this Smart Dustbin
Connect the USB power supply via a USB cable and power bank.
Place your hand in front of the ultrasonic sensor.
The lid opens, drop your thing it will automatically close.
Disconnect the power cable when the dustbin is not in use.
This is a perfect desktop smart dustbin.
Working video or Smart Arduino project
This video shows step-by-step instructions on building this project.
You can see how cool it works and a perfect device to collect your things.
This was all about making Smart Dustbin using Arduino, if you have any questions ask me in the comments, Thank you
As an Amazon Associate, I earn commission from qualifying purchases.