Hi readers in this post we will see Making a Unique DC Motor using an old DC motor.
DC motors are mostly found in radio-controlled toys and in electronic gadgets like small table fans.
The uses of this tiny but useful electronic device are almost limitless.
I had an unused DC motor on my cupboard for quite a while, I wanted to create something useful.
In this small and useful post let’s make an interesting semi frameless DC motor.
What to Expect after DC Motor Disassembly
Apart from this being a modification project there are many things you can expect to learn.
The first one is the hands-on experience of how to disassemble a DC motor.
Another is the working of a motor and the role of each part for final working.
Enhances the creativity within you and develops an interest in recycling things.
Bonus Tip: Thinking of getting a Multimeter for your projects? Here is the Ultimate Guide you Don’t want to miss
Materials Required
- Small DC motor
- 3D printed part or frame
- Compass or a small screwdriver
- Hot glue
- Battery for testing
Scavenge Motor For Making Unique DC Motor
The main parts essential for running a motor is inside the motor! so we will get those.
Use the tip of the compass or a screwdriver to remove the small metal lock by the end of the motor casing.
On the below visuals I have given numbers for the steps to follow.

After you loosen the lock, remove the base.
The base part holds the brushes that provide power to the rotor part.
Note that the brush part has to be taken out carefully since it has pins that are pre-aligned.
After you have the brushes we can scavenge the magnets from this dc motor.
How to remove magnets from a small DC motor
This is the interesting part of our project, there are multiple ways to do this, but here is the easy way.
Insert the probe of the compass inside the metal case of the motor and try to pull the inside pin.
After 3 to 4 attempts I was able to take the pin out that supports 2 magnets.
You can directly take the magnets out after removal of the the pin.
Note that there will be some greasy substance or a lubricant used inside the DC motor.
Wipe this oil or lubricant with a clean cloth and keep all the parts handy.

From the 4th image of this step, you can see that all the inside parts of the motor are kept on the sheet of paper.
There are 7 parts inside a DC motor, and only 4 are necessary for our project.
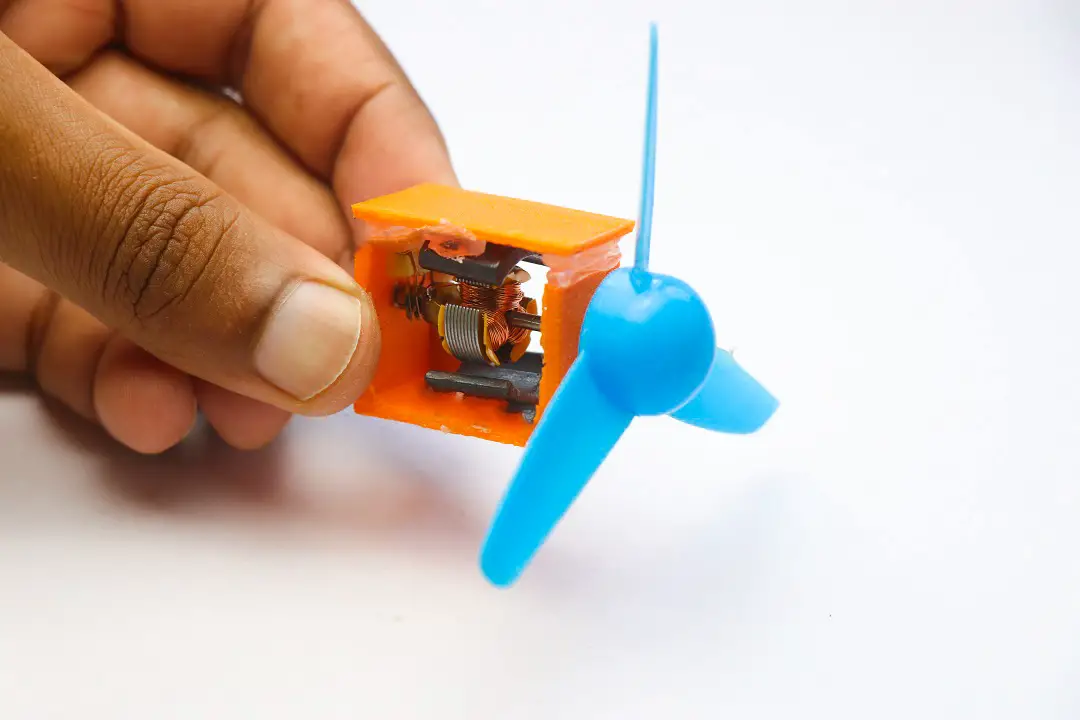
Assembling parts on a new 3D-printed frame
The 3D-printed frame holds all the parts of the earlier motor and hence i say Making Unique DC Motor.
You can get this DC Motor Frame STL from Thingiverse Check the print settings before you print
After you get the 3D print part we can assemble the parts. As shown in the first visual start with the rotor part.
It is like a press fit, just insert one shaft of the rotor first and then the other.

Now add a drop of hot glue to the first piece of magnet and stick to the base of the frame below the rotor.
The brush part needs to be glued as shown in the second visual.
The closing part will be hot glued above, and later the second half of the magnet to this part.
Don’t overheat the glue, normal temperature is sufficient for this job.
By the end of this step, our motor is ready for use.
The only thing pending here is adding a propeller or a fan to the shaft of the DC motor.

You can start using the motor now, Connect the battery wires to the brush terminal and you are good to go.
I used a single Lithium-Ion battery to supply power for this motor, if you are willing you can use other small DC sources too.
If your motor does not run by any chance just look if the brushes are in contact with the rotor commutator.
You can watch the complete tutorial of Making Unique DC Motor project here.
If you are left with any questions drop in the comments and we will respond to it shortly.
As an Amazon Associate, I earn commission from qualifying purchases.