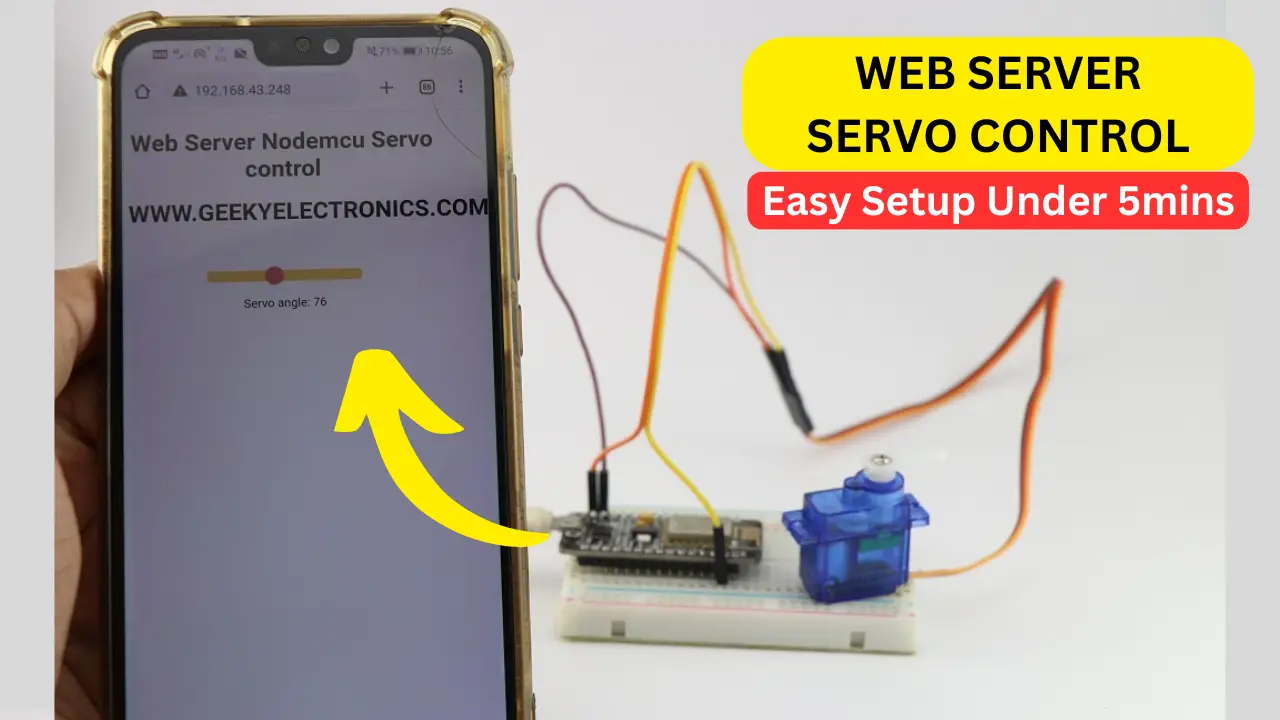
Hi readers in this post we will see how to make a Nodemcu Web Server Servo Control project.
In this tutorial, we will go through the process of creating a Nodemcu web server servo control project.
Using a Nodemcu board, a breadboard, a micro servo, and jumper wires, you will learn how to build a web-based interface that allows you to control a servo motor remotely.
Why Nodemcu Web Server Servo Control
How cool is it to control a servo with your smartphone?
This project is a great introduction to IoT and web-based control systems that will be helpful in your upcoming projects.
Let’s dive in and create our own Nodemcu Web Server Servo Control system!
If you think of Iot projects Nodemcu is on the first list because of its budget-friendliness so we are choosing this board.
You might also like our smart glasses for the blind project
Materials required for servo web server project
- Nodemcu board
- Breadboard
- Micro servo motor
- Jumper wires
- USB cable
- Computer with Arduino IDE installed
- Wi-Fi network

NodeMCU
In our project, the NodeMCU acts as the brain for the entire operation. It hosts a web server, handles client requests, and controls the servo motor based on the user’s input from the web page.
Breadboard
In this project, the breadboard acts as a physical base for connecting the NodeMCU, servo motor, and other components.
Micro Servo
The micro servo is an output device in this project. The servo’s role is to physically move to the angle specified by the web interface.
Jumper Wires
Jumper wires are used to establish electrical connections between different components on the breadboard.
They provide the necessary pathways for signals and power to flow between the NodeMCU, servo motor, and any other connected components.
Web Server
The web server is a software component running on the NodeMCU that checks for incoming HTTP requests from clients, in our case, a web browser.
It’s responsible for serving the HTML, CSS, and JavaScript code that creates the user interface (UI) with the slider.
Slider
The slider is a user interface element in the web page served by the NodeMCU’s web server.
It allows us to interact with the servo by selecting a value by dragging a thumb.
Also, the slider’s position indicates the desired angle for the servo motor.
As we move the slider, the corresponding angle information is sent back to the NodeMCU for processing.
Nodemcu Servo Web Server Control Circuit Diagram
The connections are very simple all you have here is servo.
From the circuit diagram you already know, I will still give the explanation.

- Connect the Nodemcu board to the breadboard.
- Servo has 3 pins out of which 2 are for power supply and one is for signal
- Connect the power (VCC and GND) pins of the micro servo to the 3v and GND pins on the breadboard.
- Connect the control pin of the micro servo to a digital pin D1 on the Nodemcu board.
- Ensure the connections are secure and double-check the jumper wiring

Nodemcu servo web server control code
Open the Arduino IDE on your computer.
Install the necessary libraries for Nodemcu by going to Sketch > Include Library > Manage Libraries. Search for “Nodemcu” and install the appropriate library

Copy and paste the code as you see in the above program image.
On the first tab use the Arduino code whereas on the second tab page index.
After you paste the first code press ctrl+shift+n you will have an option to create a new tab.
Name it as the above and paste the below- below HTML codes.
#include <ESP8266WiFi.h>

#include <WiFiClient.h>

#include <ESP8266WebServer.h>

//Include the Servo Library

#include <Servo.h>


#include "PageIndex.h"; //--> Include the contents of the User Interface Web page, stored in the same folder as the .ino file


#define ServoPort D1   //--> Defining Servo Port


//Make a wifi name and password as access point

const char* ssid = "geekyelectronics.com";  // your SSID

const char* password = "exploreelectronics"; //WIFI Password

//


Servo myservo;  //--> create servo object to control a servo


ESP8266WebServer server(80);  //--> Server on port 80


//This routine is executed when you open NodeMCU ESP8266 IP Address in browser

void handleRoot() {

 String s = MAIN_page; //Read HTML contents

 server.send(200, "text/html", s); //Send web page

}


//Procedure for handling servo control

void handleServo(){

  String POS = server.arg("servoPOS");

  int pos = POS.toInt();

  myservo.write(pos);   //--> Move the servo motor according to the POS value

  delay(15);

  Serial.print("Servo Angle:");

  Serial.println(pos);

  server.send(200, "text/plane","");

}


void setup() {

  Serial.begin(115200);

  delay(500);


  myservo.attach(ServoPort); //--> attaches the servo on D1 to the servo object


  WiFi.begin(ssid, password);

  Serial.print("Connect your wifi laptop/mobile phone to this NodeMCU Access Point : ");

  Serial.println(ssid);

  Serial.println("Connecting to WiFi");

  while (WiFi.status() != WL_CONNECTED) {

    delay(1000);

    Serial.println(".");

  }


  // Print ESP8266 Local IP Address

  Serial.println(WiFi.localIP());


  //Initialize Webserver

  server.on("/",handleRoot);  //--> Routine to handle at root location. This is to display web page.

  server.on("/setPOS",handleServo); //--> Sets servo position from Web request

  server.begin();

  Serial.println("HTTP server started");

}


void loop() {

 server.handleClient();

}
HTML Program for web server console
You can also make additional changes to this program if you have hands-on experience with HTML.
Basically, you can make changes to the names and color of the slider.
const char MAIN_page[] PROGMEM = R"=====(

<!DOCTYPE html>

<html>

  <head>

    <meta name="viewport" content="width=device-width, initial-scale=1">

    <style>

      html {

        font-family: Arial;

        display: inline-block;

        margin: 0px auto;

        text-align: center;

      }


      .slidecontainer {

        width: 100%;

      }


      .slider {

        -webkit-appearance: none;

        width: 50%;

        height: 15px;

        border-radius: 5px;

        background: orange;

        outline: none;

        opacity: 0.5;

        -webkit-transition: .2s;

        transition: opacity .2s;

      }


      .slider:hover {

        opacity: 2;

      }


      .slider::-webkit-slider-thumb {

        -webkit-appearance: none;

        appearance: none;

        width: 25px;

        height: 25px;

        border-radius: 50%;

        background: brown;

        cursor: pointer;

      }


      .slider::-moz-range-thumb {

        width: 25px;

        height: 25px;

        border-radius: 50%;

        background: #4CAF50;

        cursor: pointer;

      }

    </style>

  </head>

  <body>


    <h1>NodeMCU ESP8266 Web Server Micro Servo Control</h1>
    <h2>WWW.GEEKYELECTRONICS.COM</h2>

    <br><br>

    <div class="slidecontainer">

      <input type="range" min="0" max="180" value="50" class="slider" id="myRange">

      <p>Servo angle: <span id="demo"></span></p>

    </div>


    <script>

      function sendData(pos) {

        var xhttp = new XMLHttpRequest();

        xhttp.onreadystatechange = function() {

          if (this.readyState == 4 && this.status == 200) {

            console.log(this.responseText);

          }

        };

        xhttp.open("GET", "setPOS?servoPOS="+pos, true);

        xhttp.send();

      }

      var slider = document.getElementById("myRange");

      var output = document.getElementById("demo");

      output.innerHTML = slider.value;


      slider.oninput = function() {

        output.innerHTML = this.value;

        sendData(output.innerHTML);

      }

    </script>


  </body>

</html>

)=====";
How to upload a program to Nodemcu using Arduino IDE
- Connect your Nodemcu to your computer using the USB cable.
- Select the correct board and port from the Arduino IDE.
- Click the “Upload” button to upload the code to the Nodemcu board.
- Once the code is uploaded, disconnect the Nodemcu from your computer.
- Power the Nodemcu using a suitable USB power source.
- Connect to the Wi-Fi network to which your Nodemcu is connected.
- Open a web browser and enter the Nodemcu’s IP address
- You can check for IP address of your nodemcu board by just checking the connected device section.
- A web page with a slider will appear after you enter IP address.
- Slide the slider to control the position of the servo motor.
That’s amazing You’ve successfully created a Nodemcu web server servo control project.
This project shows the power of IoT and remote control using a simple web interface.
You can further expand this project by adding more servos, integrating sensors, or enhancing the web interface. Anyways there is no limit to creativity.
Have fun experimenting and exploring the world of IoT where this will serve as a base.
Thank you for your interest in the Nodemcu web server Servo Control project.
This project bridges the gap between physical devices and web-based interfaces, opening doors to endless possibilities in the world of IoT and remote control systems.
The complete working video of this project is here.
As an Amazon Associate, I earn commission from qualifying purchases.