How to Test a Battery with a Multimeter? This essential skill allows you to quickly assess a battery’s charge and health, saving you from unnecessary replacements and frustrating power issues. Mastering this technique provides clarity on whether a battery is genuinely dead or if another electrical problem is at play.
Understanding the simple steps involved in this practice can empower you to diagnose countless devices, from remote controls and flashlights to car batteries and household appliances, ensuring optimal performance and efficiency.
Quick Answers to Common Questions
What setting should I use on my multimeter to test a battery?
When you’re learning how to test a battery with a multimeter, set it to DC voltage (VDC or V with a straight line) and select a range just above your battery’s nominal voltage, such as 20V DC for standard 1.5V or 9V batteries.
How do I correctly connect the probes to the battery terminals?
It’s super simple! Connect the red (positive) probe to the battery’s positive terminal and the black (negative) probe to its negative terminal. Getting this right is essential for an accurate voltage reading when you want to test a battery with a multimeter.
What does a “good” battery typically read on the multimeter?
A healthy 1.5V battery should read around 1.5V or slightly higher, while a 9V battery should be close to 9V. If the voltage is significantly lower than its rating (e.g., 1.2V for a 1.5V battery), it’s likely dead or very low on power.
📑 Table of Contents
Understanding Your Multimeter and Battery Types
Before you begin the process of checking your battery, it’s crucial to familiarize yourself with your multimeter and the various types of batteries you might encounter. A multimeter is a versatile electronic measuring instrument that combines several measurement functions in one unit, such as voltage, current, and resistance. For testing batteries, you’ll primarily be using its DC voltage (Direct Current Voltage) function.
Digital vs. Analog Multimeters
- Digital Multimeters (DMMs): These are the most common type today, featuring a clear LCD screen that displays readings numerically. They are generally easier to read and more accurate for beginners.
- Analog Multimeters: These use a needle and a graduated scale to show readings. While they offer a good visual representation of changing values, they can be harder to read accurately, especially for precise measurements.
Setting the DC Voltage Range
Your multimeter will have a rotary dial to select different measurement functions and ranges. For batteries, look for the ‘V’ symbol with a straight line and three dots above or below it (indicating DC Voltage). You’ll also see various voltage ranges, such as 2V, 20V, 200V, or 1000V. Always choose a range slightly higher than the nominal voltage of the battery you are testing. For example, for a 1.5V AA battery, select the 2V or 20V range. For a 9V battery, choose 20V. For a 12V car battery, the 20V range is appropriate.
Common Battery Types
Batteries come in numerous forms, each with a specific nominal voltage. Understanding these will help you interpret your readings correctly:
- Alkaline Batteries: AA, AAA, C, D (1.5V each), 9V.
- Lithium Coin Cells: CR2032, CR2025, etc. (typically 3V).
- Rechargeable NiMH/NiCd: AA, AAA, C, D (typically 1.2V each).
- Lead-Acid Batteries: Car batteries (typically 12V), marine batteries.
- Lithium-ion: Found in phones, laptops, power tools (typically 3.7V per cell).
Safety First: Essential Precautions
While testing most household batteries is relatively safe, working with electricity always requires caution. Taking simple safety measures will protect both you and your equipment.
Personal Protective Equipment (PPE)
- Safety Glasses: Always wear eye protection to guard against potential battery leaks or unexpected events, especially when dealing with older or damaged batteries.
- Gloves: Consider wearing non-conductive gloves, particularly if the battery shows signs of leakage or corrosion, as battery acid can be corrosive.
Multimeter and Battery Handling
- Inspect Leads: Before each use, check your multimeter’s test leads for any cuts, frayed insulation, or exposed wire. Damaged leads can pose a shock hazard or lead to inaccurate readings.
- Avoid Short Circuits: Never allow the positive and negative probes of the multimeter to touch each other while connected to a battery, especially larger ones like car batteries. This can create a short circuit, potentially damaging the battery, the multimeter, or even causing sparks and heat.
- Correct Polarity: Ensure you connect the red probe to the positive terminal and the black probe to the negative terminal. While reversing polarity for a brief voltage test generally won’t harm the multimeter, it will result in a negative reading, which can be confusing.
- Work in a Well-Ventilated Area: For larger lead-acid batteries (like car batteries), they can emit hydrogen gas when charging or discharging, which is flammable. Ensure good ventilation to disperse any gases.
- Handle Leaking Batteries Carefully: If a battery is visibly leaking, handle it with extreme care, using gloves and disposing of it properly according to local regulations.
Step-by-Step Guide: Testing Your Battery
With your multimeter ready and safety precautions in place, you can now proceed with measuring your battery’s voltage. This straightforward process will give you an immediate indication of its charge level.
How to Test a Battery with a Multimeter: The Essential Steps
- Prepare Your Multimeter:
- Turn on your multimeter.
- Rotate the dial to the DC Voltage setting (V with a straight line and dots).
- Select the appropriate voltage range. For most small household batteries (1.5V, 9V), the 20V range is a safe bet. For a 12V car battery, also use the 20V range.
- Plug the black test lead into the “COM” (common) jack.
- Plug the red test lead into the “VΩmA” or “V” jack (the one designated for voltage, resistance, and sometimes milliampere readings).
- Identify Battery Terminals:
- Locate the positive (+) and negative (-) terminals on your battery. For AA, AAA, C, and D batteries, the positive terminal is typically the raised bump, and the negative is the flat end. For 9V batteries, the larger, hexagonal terminal is negative, and the smaller, circular one is positive. Car batteries have clearly marked posts.
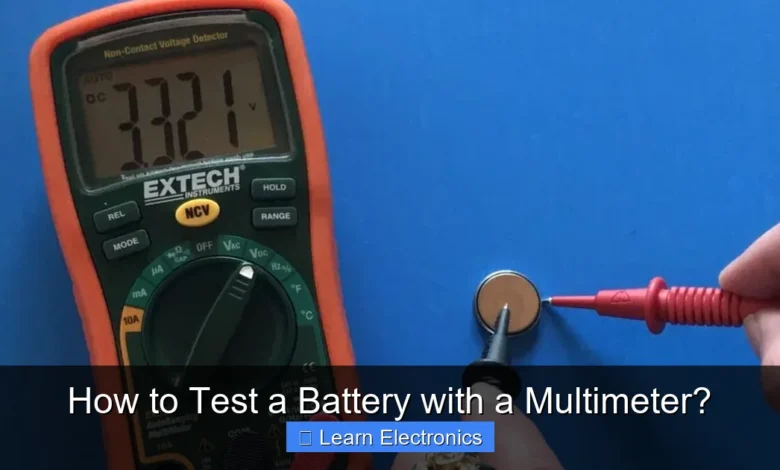
- Connect the Test Leads:
- Touch the tip of the red (positive) test lead to the battery’s positive (+) terminal.
- Touch the tip of the black (negative) test lead to the battery’s negative (-) terminal.
- Ensure good contact between the probes and the terminals. You might need to hold them firmly in place.
- Read the Display:
- Once the leads are connected correctly, the multimeter display will show a voltage reading.
- Take note of the number. If you see a negative sign before the number, it means you’ve reversed the polarity (connected red to negative and black to positive). Simply reverse the leads, and the negative sign will disappear, but the voltage value will remain the same.
- Disconnect the Leads:
- Carefully remove the test leads from the battery terminals.
- If you’re done testing, turn off your multimeter to save its internal battery.
Interpreting Your Multimeter Readings
Once you have a voltage reading, the next crucial step is to understand what it means for the battery’s health. A battery’s nominal voltage is its advertised voltage (e.g., 1.5V for an AA battery, 12V for a car battery). However, a fully charged battery will often read slightly higher than its nominal voltage, and a dying or dead battery will read significantly lower.
What the Readings Indicate
- Fully Charged/Good Condition: The voltage reading is at or slightly above the battery’s nominal voltage. For example, a new 1.5V alkaline AA battery might read around 1.55V to 1.6V when fresh. A 12V car battery might read 12.6V to 12.8V.
- Low Charge/Nearing End of Life: The voltage is noticeably below the nominal voltage but not zero. A 1.5V AA battery reading 1.3V-1.4V is often low. A 9V battery reading 7V-8V is weak. For a 12V car battery, anything below 12.4V suggests a need for recharging or replacement.
- Dead/Discharged: The voltage is very low, close to 0V, or significantly below the “low” threshold. A 1.5V battery reading below 1.2V is usually considered dead. A 9V battery below 6V is dead. A car battery below 12V is severely discharged and likely won’t start an engine.
It’s important to note that a battery’s “open circuit” voltage (measured without a load) can sometimes appear acceptable even if the battery is failing. This is because a weak battery might still hold a surface charge but quickly drops voltage when current is drawn from it. For most general household uses, an open-circuit voltage check is sufficient to determine if a battery is truly depleted.
Common Battery Types and Expected Voltages
To help you interpret your readings more effectively, here’s a quick reference table for common battery types and their typical voltage ranges.
| Battery Type | Nominal Voltage | Full Charge Voltage (Approx.) | Low Voltage Indication (Approx.) | Dead Voltage (Approx.) |
|---|---|---|---|---|
| AA, AAA, C, D (Alkaline) | 1.5V | 1.55V – 1.65V | 1.3V – 1.4V | Below 1.2V |
| AA, AAA, C, D (NiMH/NiCd Rechargeable) | 1.2V | 1.4V – 1.45V | 1.1V – 1.2V | Below 1.0V |
| 9V (Alkaline) | 9V | 9.0V – 9.6V | 7.5V – 8.5V | Below 6.5V |
| Lithium Coin Cell (e.g., CR2032) | 3V | 3.0V – 3.3V | 2.7V – 2.8V | Below 2.5V |
| 12V Car Battery (Lead-Acid) | 12V | 12.6V – 12.8V | 12.4V – 12.6V (needs charge) | Below 12.0V (severely discharged) |
| 18V Power Tool Battery (Li-ion Pack) | 18V (nominal) | 20V – 21V (max charge) | 16V – 17V | Below 15V |
Note: These values are approximate and can vary slightly based on battery chemistry, age, and temperature.
Troubleshooting and Advanced Tips
Sometimes, your battery testing doesn’t go as smoothly as expected. Here are some common issues and advanced considerations.
Common Troubleshooting Scenarios
- Zero Reading: If your multimeter reads 0V, first check if the multimeter is turned on and set to the correct DCV range. Ensure the test leads are properly inserted into the correct jacks and making good contact with the battery terminals. The battery might also be completely dead.
- Negative Reading: As mentioned, a negative voltage reading simply means you’ve reversed the polarity of your test leads. Swap them, and the positive voltage will appear.
- Fluctuating Readings: Unstable readings can indicate poor contact between the probes and terminals, a faulty battery, or an issue with the multimeter itself. Ensure firm contact.
- No Display: Check the multimeter’s internal battery. Most multimeters require their own battery to operate.
Testing Batteries Under Load
An open-circuit voltage test is a good initial indicator, but it doesn’t tell the whole story, especially for larger batteries like car batteries or those in high-drain devices. A weak battery might show a good voltage without a load but quickly drop its voltage when a load (like starting a car engine or powering a powerful tool) is applied. For more accurate diagnostics, particularly for car batteries, a "load tester" is used, which simulates current draw and measures voltage drop under stress. However, for most household batteries, the open-circuit multimeter test is sufficient for general diagnostic purposes.
When to Recharge vs. Replace
- Rechargeable Batteries: If your NiMH or NiCd rechargeable batteries read low, they simply need to be recharged. Continual deep discharging can reduce their lifespan, so regular charging is beneficial.
- Alkaline Batteries: These are single-use batteries. Once their voltage drops below the usable threshold, they should be replaced and properly recycled. Attempting to recharge non-rechargeable batteries can be dangerous.
- Car Batteries: A low reading on a car battery usually means it needs recharging. If, after charging, it still reads low or fails to hold a charge, it’s likely time for replacement.
Advanced Concepts: Internal Resistance
Beyond simple voltage checks, the internal resistance of a battery is a critical indicator of its health. A high internal resistance means the battery struggles to deliver current, even if its voltage appears acceptable. Specialized battery testers can measure internal resistance, providing a more comprehensive diagnosis, but this goes beyond the basic multimeter battery test.
Conclusion
Learning how to test a battery with a multimeter is a fundamental skill for anyone interested in electronics or simply looking to save money and avoid frustration. This straightforward method allows you to quickly determine the health and charge of various batteries, from common household cells to vital car batteries.
By following the steps outlined, understanding your readings, and prioritizing safety, you can accurately diagnose battery issues, make informed decisions about replacement or recharging, and ensure your devices are always powered efficiently. Embrace this practical skill, and you’ll find yourself much more confident in tackling everyday power problems.
Frequently Asked Questions
Why should I test a battery with a multimeter instead of just replacing it?
Testing a battery with a multimeter helps you accurately determine its remaining charge and overall health. This prevents unnecessary replacements, saves money, and ensures you’re only replacing truly dead or failing batteries.
How do I properly set my multimeter to test a battery?
First, select the DC Voltage (V= or VDC) setting on your multimeter, usually in a range higher than the battery’s nominal voltage (e.g., 20V for a 1.5V or 9V battery). Then, connect the red probe to the positive terminal and the black probe to the negative terminal of the battery.
What are typical voltage readings I should expect when testing common batteries with a multimeter?
For a healthy 1.5V alkaline battery, you should see around 1.5V to 1.6V. A 9V battery should read close to 9V. Rechargeable batteries like NiMH AA/AAA typically read 1.2V when charged. Readings significantly below the nominal voltage indicate a depleted or failing battery.
Can a multimeter be used to test all types of batteries, including car batteries?
Yes, a multimeter is versatile enough to test most common battery types, from small household batteries to larger car batteries. For car batteries, ensure your multimeter’s DC voltage range goes up to at least 20V or higher, and connect it directly to the battery terminals.
What does it mean if my multimeter shows a very low or zero reading when testing a battery?
A very low or zero reading indicates that the battery is either completely dead, severely discharged, or potentially faulty. Before concluding the battery is dead, double-check your multimeter settings and probe connections to ensure they are correct.
As an Amazon Associate, I earn commission from qualifying purchases.


