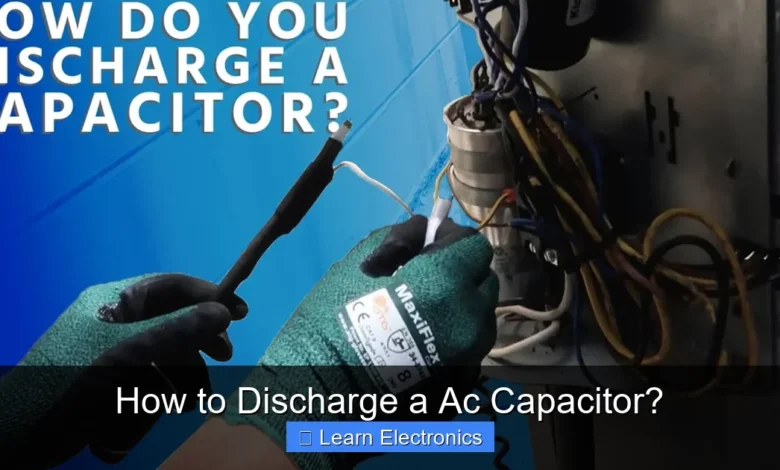
How to Discharge a AC Capacitor? This critical safety procedure involves carefully releasing the stored electrical energy to prevent electric shock and damage to equipment. Mastering this technique is essential for anyone working with AC circuitry, ensuring a safe and effective maintenance or repair process.
Working with capacitors in AC systems demands respect for their stored charge. Even after power is disconnected, these components can retain a significant and dangerous voltage, making proper discharge a non-negotiable step for personal safety and equipment integrity.
Quick Answers to Common Questions
Is it truly necessary to discharge an AC capacitor before handling it?
Absolutely! An AC capacitor can hold a dangerous electrical charge even after power is off, posing a serious shock risk. Always discharge an AC capacitor to ensure your safety and prevent nasty surprises!
What’s the best way to safely discharge an AC capacitor?
The safest and most common method to discharge an AC capacitor is by using a high-wattage resistor with insulated leads. Connect the resistor across the capacitor terminals for a few seconds until the charge dissipates completely.
How can I confirm an AC capacitor is completely discharged?
After using your discharge tool, always double-check with a multimeter or voltmeter set to the appropriate AC voltage range. Touch the probes to the capacitor terminals; a reading close to zero volts confirms it’s safe to handle.
📑 Table of Contents
Why Capacitor Discharge is Crucial for Safety
Capacitors are fundamental components in many AC circuits, serving various roles from motor starting to power factor correction. However, their ability to store electrical energy means they can hold a dangerous charge long after the power supply is removed. This residual charge poses several significant risks:
- Electric Shock: A charged capacitor can deliver a painful, and potentially lethal, electric shock. The voltage can remain high for extended periods, making contact extremely hazardous.
- Component Damage: An undischarged capacitor can damage sensitive electronic components if it’s reconnected or if other parts are introduced to the circuit while it’s still charged. This is especially true for microcontrollers and integrated circuits.
- Arcing and Short Circuits: Accidentally shorting a charged capacitor can create a flash or arc, which can cause burns, damage tools, and even ignite flammable materials nearby.
Therefore, safely discharging an AC capacitor is not just a best practice; it’s a mandatory safety measure that protects technicians, tools, and the equipment itself.
Essential Safety Precautions Before You Begin
Before attempting to discharge any capacitor, prioritize safety above all else. A structured approach to safety precautions is vital to prevent accidents.
Identify Capacitor Type and Circuit
First, confirm you are dealing with an AC capacitor and understand its role in the circuit. AC capacitors often appear in motor start/run circuits, power supplies, and various industrial applications. Ensure the circuit is completely de-energized and locked out according to standard safety procedures. Verify with a non-contact voltage tester and then a multimeter that no AC voltage is present at the input terminals of the equipment.
Personal Protective Equipment (PPE)
Always wear appropriate PPE. This includes:
- Insulated Gloves: Crucial for protecting against electrical shock.
- Safety Glasses or Face Shield: To protect eyes from potential arcing or component failure.
- Non-Conductive Work Surface: Work on a rubber mat or other insulated surface.
Ensure your tools are also insulated to prevent accidental shorts or shocks.
The Preferred Method: Resistor Discharge Tool
The safest and most controlled way to discharge an AC capacitor is by using a specialized resistor discharge tool. This tool allows the stored energy to dissipate safely and gradually.
Building Your Own Discharge Tool
A simple yet effective discharge tool can be easily assembled. You will need:
- High-Wattage Resistor: Choose a non-inductive power resistor. The resistance value should be high enough to limit current (e.g., 5-25 kΩ) but low enough to discharge the capacitor in a reasonable time. The wattage rating must be sufficient to handle the peak power dissipated during discharge (e.g., 5-20 W).
- Insulated Probes or Alligator Clips: To make a secure and safe connection to the capacitor terminals.
- Insulated Wire: To connect the resistor to the probes/clips.
Solder the resistor between the two probes/clips. Ensure all connections are robust and well-insulated, leaving no exposed conductive parts except the probe tips.
The Discharge Process Step-by-Step
Here’s how to safely discharge AC capacitors using your resistor tool:
- Disconnect Power: Absolutely critical. Ensure the device or circuit containing the capacitor is completely unplugged or de-energized from all power sources.
- Verify Power Off: Use a multimeter to confirm zero voltage at the device’s main power input.
- Connect Discharge Tool: With your insulated gloves on, securely connect one probe of your discharge tool to one terminal of the capacitor.
- Touch Second Terminal: Touch the second probe of the discharge tool to the other terminal of the capacitor. You might observe a small spark, especially with larger capacitors, as the initial current flows.
- Hold Connection: Maintain the connection for several seconds, or even a minute for very large capacitors (e.g., those found in motor drives or large power supplies), allowing the charge to dissipate through the resistor.
- Repeat (Optional): For maximum safety, remove the tool, wait a few seconds, and then re-connect the tool for another brief period. This ensures any lingering charge is dissipated.
Selecting the Right Resistor
The choice of resistor is vital for safe and effective discharge. The resistor value should be high enough to limit the initial discharge current to a safe level, preventing arcing or damage to the resistor itself. A common rule of thumb is to choose a resistor that will allow the capacitor to discharge to a safe level (e.g., below 50V) within a few seconds. For most AC capacitors, a 5kΩ to 25kΩ resistor with a power rating of 5W or higher is usually appropriate. Calculate the discharge time constant (τ = RC) to estimate discharge time; it takes approximately 5τ for a capacitor to discharge almost completely.
Alternative (and Less Preferred) Discharge Methods
While the resistor method is highly recommended, some alternative methods exist, though they come with higher risks or are less controlled.
Light Bulb Method
Similar to the resistor method, a high-wattage incandescent light bulb (e.g., 60-100W) can be wired across the capacitor terminals. The bulb will glow brightly initially and then dim as the capacitor discharges. This visually confirms the discharge. However, like the resistor method, proper insulation and high-wattage bulbs are critical. This method is generally slower and less precise than using a carefully selected power resistor.
Screwdriver Method (Highly Discouraged)
This method is extremely dangerous and should never be used. It involves directly shorting the capacitor terminals with a screwdriver or other conductive object. This results in an uncontrolled, high-current discharge that causes a large spark, loud bang, and can severely damage the screwdriver, the capacitor, and potentially injure the user through arcing, burns, or flying molten metal. Always use a proper discharge tool with a resistor.
Verifying Complete Discharge
After using your preferred discharge method, it is absolutely essential to verify that the capacitor is indeed fully discharged before touching its terminals or proceeding with any work on the circuit.
Using a Multimeter for Verification
A digital multimeter (DMM) set to measure voltage (AC or DC, depending on the capacitor’s application, though it’s safer to check both) is your final safety check:
- Ensure your DMM is working correctly (e.g., by testing a known voltage source like a battery).
- Set the DMM to a voltage range higher than the capacitor’s rated voltage.
- Connect the DMM probes across the capacitor terminals.
- Observe the reading. It should be close to 0 volts (ideally below 10-20V, but aiming for 0V is safest). If you read a significant voltage, repeat the discharge process until the reading is negligible.
Safe Voltage Levels
While 0 volts is the safest target, a general guideline for “safe to touch” is often considered to be below 50 volts AC or DC, especially for casual contact. However, for internal work on sensitive electronics, aiming for less than 10-20 volts is much safer. Always err on the side of caution and verify with a multimeter.
Practical Tips for Discharging AC Capacitors Safely
Beyond the core steps, these practical tips can enhance your safety and efficiency when working with capacitors.
Calculating Discharge Time
The time it takes for a capacitor to discharge is governed by the RC time constant (τ), where R is the resistance (in Ohms) and C is the capacitance (in Farads). One time constant (τ) represents the time it takes for the capacitor’s voltage to drop to approximately 37% of its initial value. For practical purposes, it takes about 5 time constants (5τ) for a capacitor to discharge almost completely (down to less than 1% of its initial voltage).
Formula: \( \tau = R \times C \)
For example, a 100 µF (0.0001 F) capacitor discharged through a 10 kΩ (10,000 Ω) resistor:
\( \tau = 10,000 \, \Omega \times 0.0001 \, F = 1 \, second \)
So, it would take approximately 5 seconds for this capacitor to fully discharge using this resistor.
Don’t Rush the Process
Patience is key. For larger capacitors, especially those in industrial equipment, the discharge process can take longer. Never assume a capacitor is discharged just because the power is off. Give the discharge tool ample time to do its job, and always verify with a multimeter.
Handle Failed Capacitors with Care
Bulging, leaking, or burnt capacitors indicate a fault but can still hold a charge. They may also be more volatile. Exercise extreme caution when discharging such components, as they could fail catastrophically during discharge if mishandled. Always wear full PPE.
Data Table: Approximate Discharge Times (5τ)
The table below provides estimated discharge times for various common AC capacitor sizes using different resistor values. These are approximations; always measure with a multimeter.
| Capacitance (µF) | Resistor (kΩ) | Time Constant (τ in seconds) | Approx. Full Discharge Time (5τ in seconds) |
|---|---|---|---|
| 10 | 5 | 0.05 | 0.25 |
| 10 | 10 | 0.1 | 0.5 |
| 50 | 5 | 0.25 | 1.25 |
| 50 | 10 | 0.5 | 2.5 |
| 100 | 5 | 0.5 | 2.5 |
| 100 | 10 | 1.0 | 5.0 |
| 200 | 5 | 1.0 | 5.0 |
| 200 | 10 | 2.0 | 10.0 |
Conclusion
The safe and effective process of discharging an AC capacitor is a fundamental skill for anyone working with electronics. By understanding the risks, employing proper safety precautions, and utilizing a reliable resistor discharge tool, you can prevent dangerous electrical shocks and protect valuable equipment. Always remember to disconnect power, use appropriate PPE, discharge thoroughly, and verify with a multimeter. Your safety and the integrity of the components you work with depend on following these critical steps every time.
Frequently Asked Questions
Why is it important to discharge an AC capacitor before handling?
AC capacitors can store a significant electrical charge even after power is removed, posing a serious shock hazard. Discharging it ensures your safety and prevents potential damage to other components when you work on the circuit.
What is the safest way to discharge an AC capacitor?
The safest method involves using a high-wattage resistor (e.g., 20,000 ohms, 5W) attached to insulated probes. Connect the probes across the capacitor terminals until the voltage drops to a safe level, typically below 50 volts, which can be verified with a multimeter.
How long does it take to fully discharge an AC capacitor?
The time required depends on the capacitor’s capacitance and the resistor’s value used for discharging. Generally, for most common AC capacitors, connecting a suitable discharge resistor for a few seconds to a minute is sufficient, but always verify with a multimeter that the voltage is near zero.
Can I just short an AC capacitor with a screwdriver to discharge it?
No, directly shorting an AC capacitor with a screwdriver is extremely dangerous and not recommended. This can create a large spark, damage the screwdriver, potentially damage the capacitor, and still pose a shock risk due to the rapid, uncontrolled discharge. Always use a proper discharge tool with a resistor.
What tools are essential for safely discharging an AC capacitor?
You will primarily need an appropriate discharge tool, which is typically a high-wattage resistor soldered to insulated test probes. Additionally, a multimeter is crucial to verify that the AC capacitor has been safely discharged and that its voltage has dropped to zero or a very low level.
As an Amazon Associate, I earn commission from qualifying purchases.


