How to Test a Motor Starting Capacitor? involves checking its capacitance and for shorts or opens using appropriate tools like a multimeter or a dedicated capacitor tester. This method is fundamental for diagnosing common motor issues in appliances, HVAC systems, and other machinery. Understanding the correct procedure is crucial for troubleshooting efficiently and ensuring the longevity of your equipment.
Quick Answers to Common Questions
How can I tell if my motor starting capacitor is failing?
You might notice your motor humming but not starting, or it struggles to get going. Visible signs like a bulging or leaking motor starting capacitor are also big red flags indicating it’s time to test or replace it.
What tools do I need to test a motor starting capacitor?
All you really need is a multimeter with a capacitance (µF) setting, which is essential for accurately testing your motor starting capacitor. Safety gloves and eye protection are also highly recommended!
What’s the safest way to test a motor starting capacitor?
First and foremost, always ensure the power is off and discharge the capacitor safely using a properly insulated tool before handling it. Then, use your multimeter to check the capacitance (µF) reading against the manufacturer’s specifications printed on the starting capacitor itself.
📑 Table of Contents
Understanding Motor Starting Capacitors
Motor starting capacitors are critical components in many single-phase AC motors, particularly those found in compressors, pumps, and fans. Their primary role is to provide an initial burst of torque to overcome the motor’s inertia and bring it up to speed quickly. They achieve this by creating a phase shift in the current supplied to a separate start winding, generating a rotating magnetic field that helps the rotor begin turning.
What They Do and Why They Fail
Once the motor reaches about 75% of its operating speed, a centrifugal switch or a potential relay typically disconnects the starting capacitor from the circuit. If this component fails, the motor may struggle to start, hum loudly without spinning, or not start at all. Common failure modes include:
- Open Circuit: The internal connection breaks, preventing any current flow.
- Short Circuit: The internal plates touch, creating a direct path for current and bypassing the capacitance.
- Loss of Capacitance: The capacitor’s ability to store a charge degrades over time, often due to heat or age, resulting in insufficient starting torque.
- Physical Damage: Swelling, leaking, or bulging are visible signs of internal failure, often caused by excessive heat or voltage spikes.
Recognizing these issues is the first step in effective troubleshooting, making a reliable testing procedure invaluable.
Safety First: Preparing for the Test
Before you even think about touching a motor starting capacitor, safety must be your absolute top priority. These devices can store a significant electrical charge, even after power has been removed, and can deliver a dangerous or even lethal shock. Always assume the capacitor is charged until you have safely discharged it.
Crucial Safety Steps Before Any Testing
Always follow these guidelines:
- Disconnect Power: Ensure the motor or appliance is completely disconnected from its power source. Unplug it or turn off the circuit breaker at the main panel. Verify with a voltage tester that no power is present.
- Wear PPE: Don heavy-duty electrical gloves (rated for the voltage you might encounter), safety glasses, and non-conductive footwear.
- Identify the Capacitor: Locate the capacitor, which usually looks like a metal or plastic cylinder.
- Discharge the Capacitor: This is arguably the most critical step. Using a properly insulated screwdriver with a conductive shaft, carefully short the terminals of the capacitor. You may see a spark, which indicates a discharge. Repeat this process a few times to ensure complete discharge, touching each terminal to the capacitor’s metal case (if present and grounded) and then bridging the terminals directly. Alternatively, use a resistor (20,000-ohm, 2-watt or greater) wired to leads, touching the leads to the capacitor terminals for several seconds until fully discharged. Never use bare hands or uninsulated tools.
- Allow Cooling: If the motor has just been running, allow it to cool down before handling any components.
Proceeding without discharging the capacitor is extremely dangerous and should never be attempted. Once discharged, you can safely handle the component for further inspection and testing.
Tools You’ll Need for Testing
Accurately testing a motor starting capacitor requires the right tools. While a basic multimeter can perform some checks, a dedicated capacitor tester offers more precise measurements. Here’s what you’ll typically need:
Essential Equipment
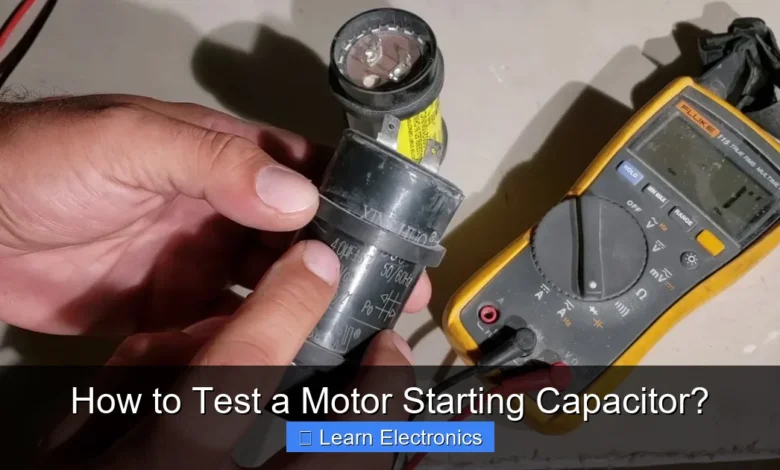
- Digital Multimeter with Capacitance Function: This is the most common tool for DIYers and professionals. Ensure it has a setting for measuring capacitance (usually indicated by ‘F’ for Farads, or µF for microfarads/MFD). Most standard multimeters can measure up to 200µF, which covers many starting capacitors.
- Dedicated Capacitor Tester: For higher precision or larger capacitance values (especially for motor run capacitors, though less critical for starting ones), a dedicated capacitor tester can provide more accurate readings and sometimes identify internal shorts or opens more definitively.
- Insulated Screwdriver: Essential for safely discharging the capacitor.
- Alligator Clip Test Leads: These can be very helpful, especially with multimeters, to securely connect to the capacitor terminals and free up your hands.
- Safety Glasses and Electrical Gloves: As mentioned, non-negotiable personal protective equipment.
- Permanent Marker (Optional): Useful for labeling leads or components if you’re working with multiple wires.
Before beginning any tests, always check the battery in your multimeter or tester to ensure accurate readings. A weak battery can lead to incorrect measurements and misdiagnosis.
The Step-by-Step Process: How to Test a Motor Starting Capacitor?
Once safety precautions are in place and your tools are ready, you can proceed with testing the capacitor. This process involves a visual inspection, followed by electrical measurements.
Visual Inspection and Initial Checks
- Remove the Capacitor: Carefully disconnect the wires from the capacitor terminals, making a note of their original positions if necessary (though starting capacitors are usually non-polarized, it’s good practice). Then, remove the capacitor from its mounting bracket.
- Inspect for Damage: Look closely at the capacitor for any physical signs of damage. This includes:
- Bulging or swelling on the top or sides.
- Leaking oil or electrolyte.
- Burn marks or discolored terminals.
- Cracked or broken casing.
Any of these signs indicate a failed capacitor, and further electrical testing may be redundant as it likely needs replacement.
Electrical Testing with a Multimeter
If the capacitor passes visual inspection, proceed with electrical testing:
- Set Multimeter to Capacitance Mode (µF/MFD): Turn your digital multimeter’s dial to the capacitance setting. Select a range higher than the capacitor’s rated value. For example, if the capacitor is rated at 50 µF, select a 200 µF range.
- Connect Test Leads: Touch one multimeter probe to one capacitor terminal and the other probe to the second terminal. Maintain a firm, steady contact.
- Read the Display: The multimeter display should show a capacitance reading. Compare this value to the capacitor’s rated capacitance, which is usually printed on its casing (e.g., 50 µF ± 5%). A healthy capacitor should show a reading within its specified tolerance range.
- Testing for Shorts (Resistance Mode – Optional but Recommended): After measuring capacitance, switch your multimeter to the highest resistance (Ohms – Ω) setting. Touch the probes to the capacitor terminals. A good capacitor will initially show a low resistance and then gradually climb to infinity (open circuit) as it charges from the multimeter’s internal battery. If the resistance remains consistently low (close to 0 ohms), the capacitor is likely shorted. If it immediately shows infinite resistance, it might be open.
Performing both capacitance and resistance checks provides a comprehensive assessment of the capacitor’s health. The capacitance reading is the most definitive indicator for starting capacitors.
Interpreting Your Readings
Understanding what your multimeter or capacitor tester tells you is crucial for accurate diagnosis. The readings will tell you if the capacitor is good, open, shorted, or has lost capacitance.
What the Numbers Mean
- Correct Capacitance (Within Tolerance): If your multimeter shows a reading that is within the specified tolerance of the capacitor (typically ±5%, ±10%, or ±20% of the labeled microfarad (µF) value), then the capacitor is likely good. For example, a 50 µF capacitor with a ±10% tolerance should read between 45 µF and 55 µF.
- Open Circuit (No Reading / OL): If your multimeter displays ‘OL’ (Over Limit) or ‘1’ (indicating an open circuit) and you’ve selected the correct range, the capacitor has an internal break and is open. This means no current can flow, and it will not help start the motor.
- Short Circuit (Near Zero Ohms): If, when testing in resistance mode, the multimeter immediately shows a very low resistance (close to 0 ohms) and stays there, the capacitor is shorted. This means the internal plates have touched, creating a direct path for current, bypassing the capacitance. A shorted capacitor will not store a charge and will fail to start the motor, potentially even tripping a breaker.
- Significantly Low Capacitance: If the reading is substantially lower than the rated value and outside the tolerance range (e.g., a 50 µF capacitor reading 30 µF), the capacitor has lost too much of its ability to store a charge. This “weak” capacitor won’t provide enough starting torque, leading to a motor that hums or struggles to start.
Always compare your measured value to the capacitor’s printed rating. If the reading falls outside the acceptable range, the capacitor is faulty and needs to be replaced.
When to Consider: How to Test a Motor Starting Capacitor for Replacement
Knowing when to replace a capacitor is as important as knowing how to test it. While electrical tests provide definitive answers, often the motor itself gives strong indications of a failing capacitor before testing is even performed.
Signs Your Capacitor May Be Failing
Watch out for these common symptoms:
- Motor Hums but Doesn’t Start: This is a classic sign. The motor receives power but lacks the initial push to begin rotating. You might even be able to spin it by hand to get it going.
- Slow or Delayed Start: The motor takes an unusually long time to get up to speed.
- Motor Fails to Start Consistently: It might work sometimes but not others, or only on cooler days.
- Tripped Circuit Breakers: A shorted capacitor can draw excessive current, causing the breaker to trip.
- Overheating Motor: A motor struggling to start or run due to a bad capacitor will often overheat, potentially leading to further damage.
- Visible Damage to Capacitor: As mentioned, any bulging, leaking, or discoloration is a clear indicator for replacement.
The Importance of Proper Replacement
When replacing a faulty capacitor, it’s critical to use one with the exact same microfarad (µF or MFD) rating and an equal or higher voltage rating. Using a capacitor with an incorrect µF value can cause the motor to operate inefficiently, overheat, or even burn out. A lower voltage rating will likely lead to premature failure of the new capacitor. Always refer to the motor’s specifications or the old capacitor’s label for the correct replacement values.
Mastering the technique for how to test a motor starting capacitor is an invaluable skill for anyone involved in electronics or appliance repair. By following safety protocols, using the correct tools, and accurately interpreting your readings, you can quickly diagnose and resolve common motor starting issues. This not only saves you money on professional repairs but also extends the life and efficiency of your valuable equipment. Always prioritize safety, and when in doubt, consult a qualified professional.
Frequently Asked Questions
How do I know if my motor starting capacitor is failing or bad?
A failing motor starting capacitor often manifests as a motor that hums but won’t start, starts slowly, or draws excessive current. You might also notice a burning smell or physical signs of damage like bulging or leaking from the capacitor itself. These symptoms indicate it’s time to test the capacitor’s functionality.
What is the most common way to test a motor starting capacitor?
The most common method involves using a multimeter with a capacitance (µF) setting. First, ensure the capacitor is safely discharged for safety, then connect the multimeter leads to the capacitor terminals and read the capacitance value displayed. This reading should be compared to the capacitor’s specified rating.
What capacitance reading should I expect from a good motor starting capacitor?
A good motor starting capacitor should display a capacitance value that is within +/- 5% to 20% of the microfarad (µF) rating printed on its label. If the reading is significantly lower, zero, or excessively high compared to the marked value, the capacitor is likely defective. Always compare the measured value to the manufacturer’s specified range.
How do I safely discharge a motor starting capacitor before testing?
Before touching or testing a motor starting capacitor, it is crucial to safely discharge any stored electrical energy to prevent shock. You can use a screwdriver with an insulated handle, shorting across the terminals while avoiding contact with the metal tip. A safer method involves using a resistor (e.g., 20,000 ohms, 5-watt) connected across the terminals for several seconds to safely bleed off the charge.
As an Amazon Associate, I earn commission from qualifying purchases.


