How to Discharge a Capacitor? Safely discharging a capacitor involves connecting a suitable resistor across its terminals to dissipate the stored energy as heat. This controlled process is vital for preventing electrical shock and protecting sensitive electronic components.
Understanding this technique is paramount for anyone working with electronics, as capacitors can retain dangerous charge levels long after power has been removed. Mastering the practice ensures both personal safety and the longevity of your equipment.
Quick Answers to Common Questions
Why is it important to discharge a capacitor?
Capacitors can store a dangerous charge even after power is removed, posing a significant shock hazard or potentially damaging other components. Learning how to properly discharge a capacitor is crucial for safety and preventing accidental short circuits during repairs or modifications.
What’s the safest way to discharge a capacitor?
The safest method involves using a power resistor of appropriate value (typically 10-20k Ohm, 5-10W). Connect the resistor across the capacitor’s terminals, and it will safely dissipate the stored energy, ensuring you effectively discharge a capacitor without risk.
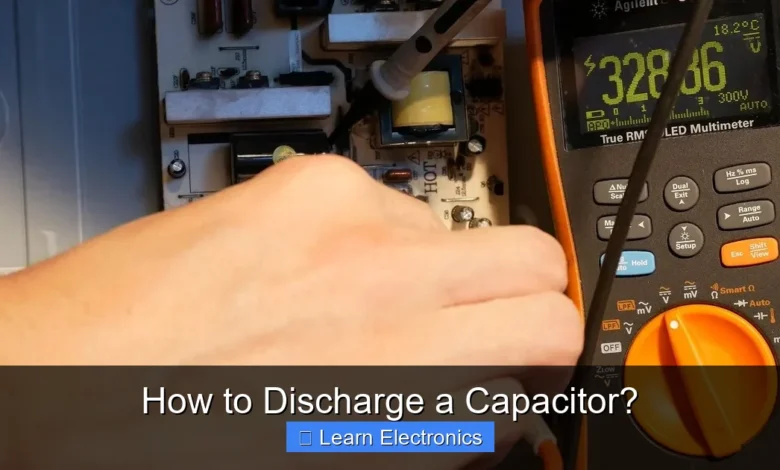
How do I know when a capacitor is fully discharged?
Always confirm with a multimeter! Set your multimeter to measure DC voltage and touch the probes to the capacitor terminals. When the reading is consistently zero or very close to it, you can be confident the capacitor is fully discharged and safe to handle.
📑 Table of Contents
- Why Proper Capacitor Discharge is Crucial
- Essential Tools and Safety Precautions for Discharging Capacitors
- Common Methods for Discharging Capacitors
- Step-by-Step Guide: Discharging a Capacitor with a Resistor
- Discharge Time Calculation Table
- Advanced Considerations and Best Practices for Discharging Capacitors
- Conclusion
Why Proper Capacitor Discharge is Crucial
Capacitors are fundamental components in nearly all electronic circuits, designed to store electrical energy. While incredibly useful, their ability to hold a charge, sometimes for extended periods even after power is disconnected, poses significant risks if not handled correctly. Improper discharge can lead to serious consequences.
Safety Hazards
The primary reason for controlled capacitor discharge is safety. A charged capacitor can deliver a painful, and potentially lethal, electrical shock. High-voltage capacitors, common in power supplies, camera flashes, and industrial equipment, can store enough energy to cause severe burns, cardiac arrest, or involuntary muscle contractions leading to falls or other injuries. Even seemingly small capacitors can deliver an unpleasant jolt.
Protecting Components
Beyond personal safety, mishandling a charged capacitor can damage other electronic components. If a charged capacitor is accidentally short-circuited or connected to a low-impedance circuit, the sudden release of energy can create a surge current. This surge can blow fuses, damage integrated circuits, or even destroy other capacitors or power supply components that aren’t designed to handle such a rapid discharge.
Maintaining Equipment Integrity
Proper discharge procedures contribute to the overall integrity and lifespan of electronic equipment. For instance, before performing maintenance or repairs on a device, ensuring all capacitors are safely discharged prevents accidental power-on or damage to diagnostic tools. It’s a fundamental step in responsible electronics work that safeguards both the technician and the apparatus.
Essential Tools and Safety Precautions for Discharging Capacitors
Before attempting to discharge any capacitor, it’s crucial to gather the right tools and adhere to strict safety protocols. Rushing this step or using inadequate equipment significantly increases the risk of injury or component damage.
Recommended Tools
- Discharge Resistor: This is the most critical tool. You’ll need a power resistor (wirewound or metal oxide film) with an appropriate resistance value and power rating. The resistance should be chosen to allow for a reasonably quick discharge without exceeding the resistor’s power dissipation limits. A common rule of thumb is a resistance that allows discharge in a few seconds to minutes, and a power rating well above the expected power dissipation during discharge.
- Voltmeter/Multimeter: Essential for verifying that the capacitor is indeed discharged to a safe voltage level (ideally 0V or close to it).
- Insulated Alligator Clips/Test Leads: To safely connect the discharge resistor and voltmeter to the capacitor terminals without direct hand contact.
- Insulated Handle Screwdriver or Discharge Tool: For initial contact, especially with high-voltage capacitors, a dedicated discharge tool designed for this purpose offers extra safety.
- Wire Strippers/Cutters: If you need to prepare leads for the resistor.
Personal Protective Equipment (PPE)
- Safety Glasses/Face Shield: Crucial for protecting your eyes from potential arcing or component failure.
- Insulated Gloves: Especially vital when dealing with high-voltage capacitors. Ensure they are rated for the expected voltage.
- Non-Conductive Work Surface: Work on a rubber mat or wooden bench, not a metal surface, to minimize the risk of accidental grounding.
Safety Protocols
- Always Assume Charged: Treat every capacitor as if it’s fully charged, even if the circuit has been disconnected from power for a long time.
- One Hand Rule: Whenever possible, work with one hand behind your back. This prevents current from flowing across your chest and through your heart in case of an accidental shock.
- Isolate Power: Ensure the circuit is completely disconnected from its power source before you begin. Unplug devices, turn off breakers, and verify with a voltage detector.
- Proper Ventilation: Some discharge methods (like shorting a very large capacitor) can generate significant heat or even a small spark. Work in a well-ventilated area.
Common Methods for Discharging Capacitors
While various ways exist, certain methods are safer and more controlled than others. The choice often depends on the capacitor’s voltage and capacitance, as well as the available tools.
Using a Resistor (The Safest and Most Controlled Method)
This is the recommended and most widely used method for discharging a capacitor. By connecting a power resistor across the capacitor’s terminals, the stored energy is gradually dissipated as heat. The resistor limits the current, preventing a sudden surge and potential damage or shock.
- Advantages: Controlled discharge, prevents damage, relatively safe.
- Disadvantages: Requires calculating appropriate resistor values and power ratings; takes time.
Dedicated Discharge Tool
Several commercial tools are designed specifically for the purpose of discharging capacitors. These often integrate a high-power resistor, sometimes with an indicator light or buzzer to confirm discharge, and come with insulated probes for safe application. Some even have internal voltage meters.
- Advantages: Convenient, specifically designed for safety, often includes verification features.
- Disadvantages: Requires purchasing a specialized tool.
Light Bulb Method (For Large Capacitors)
For very large capacitors (e.g., in welding equipment, large motor controls, or old CRT monitors), a high-wattage incandescent light bulb (e.g., 100W/230V or 60W/120V) can be used as a discharge load. The bulb lights up as the capacitor discharges, gradually dimming as the voltage drops. This provides a visual indication of the discharge progress.
- Advantages: Visual indication, handles significant energy.
- Disadvantages: Less precise than a resistor, potential for bulb filament to burn out if not carefully selected for voltage, only for large capacitors.
Note: Never discharge a capacitor by simply short-circuiting its terminals with a screwdriver. This uncontrolled method can cause arcing, damage to the capacitor, the screwdriver, and pose a significant shock hazard, especially with larger capacitors.
Step-by-Step Guide: Discharging a Capacitor with a Resistor
This guide focuses on the safest and most controlled method: using a resistor. This process is crucial for safely handling any charged capacitor.
Identify Capacitor Type and Rating
Before you begin, carefully examine the capacitor. Note its capacitance (in microfarads, µF, or picofarads, pF) and its maximum voltage rating. This information is usually printed on the component itself. This knowledge is crucial for selecting the correct discharge resistor and estimating the discharge time.
Calculate Resistor and Discharge Time
To discharge a capacitor safely, you need to select a resistor that will dissipate the energy without overheating and within a reasonable timeframe. The discharge time constant (τ) for an RC circuit is given by τ = R * C (where R is in Ohms, C is in Farads, and τ is in seconds). After approximately 5 time constants (5RC), a capacitor is considered virtually fully discharged (less than 1% of its initial charge).
- Resistor Value (R): Choose a resistance that allows for a discharge current within safe limits for the capacitor and the resistor itself. For example, for a 1000µF capacitor at 100V, a 1kΩ resistor would result in an initial current of 100mA (I=V/R) and a time constant of 1 second.
- Resistor Power Rating (P): The resistor must be able to handle the initial power surge (P = V²/R). For a 100V capacitor with a 1kΩ resistor, the initial power is (100V)² / 1000Ω = 10W. You’d want a resistor rated for at least twice this value (e.g., a 20W resistor) for a safety margin, or a burst-rated power resistor.
The Discharge Process
- Ensure Power is Off: Double-check that the circuit containing the capacitor is completely de-energized and disconnected from all power sources.
- Connect Resistor: Using insulated test leads or alligator clips, connect the discharge resistor across the capacitor’s terminals. Make sure the connections are secure and do not short-circuit anything else. Avoid touching the resistor directly during discharge, as it will get warm.
- Wait for Discharge: Allow sufficient time for the capacitor to discharge. Use the 5RC rule as a guideline. For very large capacitors, this could take several minutes.
- Monitor Voltage (Optional but Recommended): If using a multimeter, connect it in parallel with the discharge resistor and capacitor (after connecting the resistor) to monitor the voltage drop. Watch for the voltage to reach near 0V.
Verification
After the calculated discharge time has passed, and if you’ve monitored with a multimeter, it’s critical to verify the capacitor is indeed discharged.
- Disconnect Resistor: Carefully remove the discharge resistor from the capacitor terminals.
- Measure Voltage: Using a multimeter set to the appropriate DC voltage range, place the probes directly across the capacitor’s terminals. The reading should be very close to 0V (e.g., below 1V or even mV).
- Repeat if Necessary: If the voltage is still significant, reconnect the discharge resistor for more time and re-measure.
- Consider Residual Charge: For extremely critical applications, after verifying 0V, you might briefly short the terminals with a well-insulated, heavy-duty screwdriver (taking care not to short other components) to bleed off any minute residual charge, though this should only be done after the resistor discharge and voltage verification.
Discharge Time Calculation Table
The following table provides approximate discharge times for various capacitor and resistor combinations, based on the 5RC rule, where a capacitor is considered fully discharged (to less than 1% of its initial voltage) after 5 time constants (5τ). Remember, these are approximate and actual times may vary slightly.
| Capacitance (C) | Discharge Resistor (R) | Time Constant (τ = R * C) | Approx. Discharge Time (5τ) |
|---|---|---|---|
| 100 µF | 1 kΩ (1000 Ω) | 0.1 s | 0.5 s |
| 100 µF | 10 kΩ (10000 Ω) | 1 s | 5 s |
| 100 µF | 100 kΩ (100000 Ω) | 10 s | 50 s |
| 1000 µF | 1 kΩ (1000 Ω) | 1 s | 5 s |
| 1000 µF | 10 kΩ (10000 Ω) | 10 s | 50 s |
| 10000 µF | 1 kΩ (1000 Ω) | 10 s | 50 s |
| 10000 µF | 10 kΩ (10000 Ω) | 100 s | 500 s (approx. 8 min) |
Note: Ensure your chosen resistor’s power rating is sufficient for the initial voltage squared divided by its resistance (P = V²/R). Always err on the side of a higher power rating.
Advanced Considerations and Best Practices for Discharging Capacitors
While the fundamental principles remain consistent, certain situations or capacitor types require extra attention when performing the discharge process.
Large Bank Capacitors
Systems with large capacitor banks (e.g., in industrial power supplies, laser systems, or high-power audio amplifiers) store immense amounts of energy. For these, a two-stage discharge process is often recommended: first, use a high-value, high-power resistor to bring the voltage down significantly (e.g., 90% discharged), then switch to a lower-value resistor to quickly bleed off the remaining charge. Dedicated discharge systems with safety interlocks are common in industrial settings.
Electrolytic vs. Non-Electrolytic Capacitors
Electrolytic capacitors are polarized, meaning they have a positive and negative terminal that must be connected correctly. While discharging, this polarity generally doesn’t affect the resistor connection, but it’s important to be aware of for future use. Non-electrolytic capacitors (ceramic, film, mica) are generally non-polarized. Both types store energy and require careful discharge, though high-voltage electrolytics are often the greater shock hazard due to their larger capacitance values.
Always Verify Discharge
This cannot be stressed enough: never assume a capacitor is fully discharged without physically verifying its voltage with a multimeter. Even after waiting the calculated 5RC time, a faulty component or unexpected residual charge could still be present. This final measurement step is your ultimate safety check.
Post-Discharge Storage
For components being removed and stored, especially large or high-voltage capacitors, it’s good practice to leave a small bleed resistor permanently connected across their terminals. This ensures that any charge accumulated through dielectric absorption or stray fields is safely dissipated over time, preventing them from recharging unexpectedly during storage.
Additionally, when working on equipment, once a capacitor is verified discharged, you might temporarily short its terminals with a clip lead. This provides an ongoing short, guaranteeing it remains discharged while you work. Remember to remove this short before reapplying power!
Conclusion
Safely discharging a capacitor is a fundamental skill in electronics, critical for both personal safety and the protection of valuable equipment. By understanding the principles of energy storage, selecting the appropriate tools, and meticulously following established safety protocols, you can confidently work with circuits containing these powerful components.
Always remember to treat every capacitor as potentially charged, verify its discharge with a multimeter, and utilize controlled methods like a power resistor. Adopting these best practices ensures a safer and more efficient approach to all your electronic endeavors, making the process of discharging a capacitor a routine, rather than risky, task.
Frequently Asked Questions
Why is it important to discharge a capacitor before handling it?
Capacitors can store significant amounts of electrical energy, even after power is removed from a circuit. Failing to discharge them can result in dangerous electrical shocks or damage to sensitive components if you touch the terminals or work on the circuit.
What is the safest method to discharge a capacitor?
The safest method involves using a high-value power resistor connected across the capacitor terminals. This allows the stored energy to dissipate gradually and controllably as heat through the resistor. Always ensure the resistor has an adequate power rating and the leads are insulated.
How can I discharge a capacitor quickly if I don’t have a resistor handy?
For very small capacitors (e.g., tiny ceramic caps), you might momentarily short the terminals with a screwdriver *only* if you are absolutely sure it poses no shock risk and won’t damage the capacitor. However, for larger or high-voltage capacitors, this is extremely dangerous and can cause sparks, damage, or severe shock. Always prioritize safety and use a proper resistor whenever possible.
How do I confirm that a capacitor is fully discharged?
After attempting to discharge a capacitor, always verify its state using a multimeter set to measure voltage. Connect the multimeter leads across the capacitor terminals to ensure the voltage reading is zero or very close to it. Never assume it’s discharged without confirming.
As an Amazon Associate, I earn commission from qualifying purchases.


