Knowing How to Connect Two Wires? safely and effectively is a fundamental skill in electronics and home improvement, ensuring electrical continuity and reliable power delivery. This essential practice is critical for repairing damaged cables, extending circuits, or custom-building electrical components, demanding precision and adherence to safety standards for optimal results and to prevent hazards.
Mastering this technique involves understanding various connection methods, selecting the right tools, and recognizing the appropriate materials for different applications. By following established guidelines, anyone can achieve durable and secure electrical connections.
Quick Answers to Common Questions
Do I always need to strip the insulation before I connect two wires?
Yes, absolutely! You need to expose the conductive metal underneath the insulation to ensure a proper electrical connection when connecting wires. Just be careful not to cut the wire strands!
What’s the most common and secure way to connect two wires together?
For a really secure and reliable connection, twisting the stripped ends together firmly and then covering them with a wire nut is a fantastic method for connecting wires. Soldering is another excellent, permanent option if you have the tools!
After I connect two wires, how can I be sure the connection is safe and working?
Always double-check your work for exposed copper and ensure the connection is snug before applying power to protect yourself and your electronics. A quick continuity test with a multimeter is the best way to confirm you’ve successfully connected two wires.
📑 Table of Contents
Safety First: Essential Preparations Before Connecting Wires
Before you even think about stripping insulation or joining conductors, prioritizing safety is paramount. Working with electricity carries inherent risks, and proper preparation can prevent serious injury or damage. Never rush this initial phase.
Power Disconnection is Non-Negotiable
- Locate the Power Source: Identify the circuit breaker or fuse controlling the power to the wires you intend to work on.
- Turn Off Power: Flip the circuit breaker to the “OFF” position or remove the fuse.
- Verify with a Voltage Tester: Always use a non-contact voltage tester or a multimeter to confirm that the wires are completely de-energized. Touch the tester to the wires; no light or reading means it’s safe to proceed. This step is critical for your personal safety.
Personal Protective Equipment (PPE)
- Safety Glasses: Protect your eyes from stray wire strands or sparks.
- Insulated Gloves: Provide an extra layer of protection, especially when dealing with potentially live wires (though you should always ensure power is off).
Prepare Your Work Area
- Clear and Dry Space: Ensure your workspace is free of clutter, moisture, and flammable materials.
- Good Lighting: Adequate lighting is crucial for seeing small wires and connections clearly.
Understanding Wire Types and Their Insulation
Not all wires are created equal, and understanding their characteristics is vital for choosing the correct connection method and ensuring safety. The type of wire dictates how it should be handled and joined.
Solid vs. Stranded Wires
- Solid Wires: Composed of a single, thick conductor. They are rigid, durable, and commonly used in fixed wiring applications like household wiring. They are less prone to corrosion at connection points but can break if bent repeatedly.
- Stranded Wires: Made of multiple thinner strands woven together. They are flexible, resistant to fatigue from bending, and preferred for applications requiring movement, such as appliance cords or vehicle wiring. They can be more challenging to connect securely without proper tools.
Wire Gauge (AWG)
Wire gauge refers to the diameter of the wire. The American Wire Gauge (AWG) system indicates that a smaller gauge number corresponds to a larger wire diameter and thus a higher current-carrying capacity. Matching the gauge of wires you connect is crucial for preventing overheating and ensuring the connection can handle the load.
Insulation Types
The outer layer of a wire is its insulation, designed to protect the conductor and prevent short circuits. Insulation varies in material, thickness, and temperature rating. Common types include PVC, rubber, and Teflon. Always ensure that any new insulation or connection method used meets or exceeds the original wire’s insulation rating.
Common Methods for Connecting Two Wires Securely
There are several reliable ways to join wires, each suitable for different applications and environments. Choosing the right technique depends on factors like wire type, environment (indoor/outdoor, wet/dry), required strength, and the electrical load it will carry.
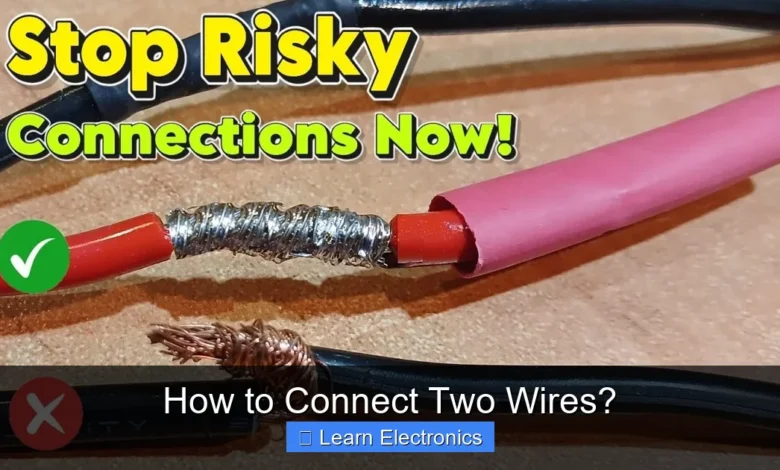
Twisting and Soldering
This method offers a highly robust and low-resistance connection, ideal for permanent installations where mechanical strength and electrical continuity are critical.
- Strip Wires: Carefully remove about 1 inch of insulation from the end of each wire using wire strippers.
- Twist Wires: Intertwine the bare conductors tightly together, creating a strong mechanical bond. A lineman’s splice (Western Union splice) offers superior mechanical strength.
- Solder Joint: Heat the twisted joint with a soldering iron until it’s hot enough to melt solder. Apply rosin-core solder to the joint, allowing it to flow and wick into the strands. Remove heat and let it cool without disturbance.
- Insulate: Once cooled, insulate the joint with heat-shrink tubing or high-quality electrical tape to prevent short circuits and environmental damage.
Wire Nuts (Twist-On Connectors)
Wire nuts are popular for quick, insulated connections in residential and light commercial wiring. They are designed for solid or stranded wires, but always match the wire gauge to the wire nut’s specifications.
- Strip Wires: Strip approximately 1/2 to 3/4 inch of insulation from each wire end.
- Align Wires: Hold the bare ends of the wires together, ensuring their ends are flush.
- Twist On: Place the wire nut over the aligned wire ends and twist clockwise firmly until tight. The internal spring coils of the nut will grip and twist the wires together.
- Verify: Give each wire a gentle tug to ensure it is securely seated within the connector.
Crimp Connectors
Crimp connectors provide a strong, gas-tight connection, making them excellent for environments with vibration, such as automotive applications, or when a quick, reliable, solderless connection is needed. They come in various types: butt connectors, ring terminals, spade terminals, etc.
- Strip Wires: Strip the wire insulation to the length specified by the crimp connector, usually about 1/4 to 3/8 inch.
- Insert Wire: Insert the bare wire into the barrel of the crimp connector.
- Crimp: Use a specialized crimping tool designed for the specific type and size of connector. Place the connector in the correct crimping die and squeeze the handles firmly until the crimp is complete.
- Test: Gently pull on the wire to ensure the connection is secure. Optionally, use heat-shrink connectors that also provide environmental sealing when heated.
Terminal Blocks and Lever-Nut Connectors
These methods allow for easy connection and disconnection of wires, often used in control panels, lighting fixtures, and temporary setups. Terminal blocks secure wires with screws, while lever-nuts (like Wago connectors) use a simple lever mechanism.
- Terminal Blocks: Strip insulation, insert the bare wire into the terminal opening, and tighten the screw to secure it.
- Lever-Nut Connectors: Strip insulation to the specified length, lift the lever, insert the wire, and push the lever back down to lock the wire in place.
Tools and Materials for Secure Wire Connections
Having the right tools is half the battle when undertaking any electrical work. Investing in quality tools ensures not only better results but also greater safety and efficiency in the practice of connecting two wires.
Essential Tools
- Wire Strippers: Crucial for removing insulation without damaging the conductor.
- Diagonal Cutters (Dikes): For cutting wires cleanly.
- Crimping Tool: Specific to the type of crimp connectors being used.
- Soldering Iron & Solder: For soldered connections.
- Heat Gun: For heat-shrink tubing.
- Voltage Tester/Multimeter: For verifying power is off and checking continuity.
Key Materials
- Wire Nuts: Match size to wire gauge.
- Crimp Connectors: Butt connectors, spade terminals, ring terminals, etc.
- Heat-Shrink Tubing: Provides excellent insulation and strain relief.
- Electrical Tape: A common insulator, but use high-quality tape and apply multiple layers.
- Terminal Blocks/Lever-Nut Connectors: For modular connections.
Testing and Securing Your Connections
After making your connection, the job isn’t done until you’ve tested its integrity and properly secured it. This step ensures both functionality and safety, which is essential for any electrical repair or installation.
Conducting a Continuity Test
A multimeter is your best friend here. Set it to continuity mode (often indicated by an audible beep or Ohm symbol). Touch the probes to each end of the connected wires (or to the terminals they now connect to). A continuous beep or a near-zero resistance reading indicates a good, conductive connection. If there’s no beep or a very high resistance, the connection is poor or open.
Ensuring Proper Insulation
After testing, thoroughly insulate all exposed conductors. Whether using heat-shrink tubing, electrical tape, or the integrated insulation of wire nuts, ensure that no bare metal is exposed. Proper insulation prevents short circuits, arcing, and protects against environmental factors.
Strain Relief and Mechanical Protection
A good electrical connection should also be mechanically robust. Strain relief prevents the wires from being pulled out of the connection point. This can be achieved by:
- Cable Clamps: Securing the cable near the connection point.
- Service Loops: Leaving a small loop of slack wire to absorb tension.
- Enclosures: Housing the connection in a junction box or electrical enclosure to protect it from physical damage and moisture.
Best Practices and Troubleshooting Common Issues
Adhering to best practices not only extends the life of your connections but also prevents future problems. Even with the best intentions, issues can arise, so knowing how to troubleshoot is valuable.
General Best Practices
- Match Wire Gauges: Always connect wires of similar gauge to ensure uniform current flow and prevent hot spots.
- Clean Connections: Ensure wires are clean and free of oils, dirt, or corrosion before connecting. Use fine-grit sandpaper or a wire brush if necessary.
- Secure Mechanical Connection: Whether twisting, crimping, or screwing, always ensure the mechanical bond is strong before adding solder or insulation.
- Don’t Over-Tighten: Especially with screw terminals, over-tightening can cut or damage the wire. Tighten firmly, then give a slight pull test.
- Label Wires: If working with multiple wires or circuits, label them clearly to avoid confusion during future maintenance.
- Consult Codes: For permanent installations, always refer to local electrical codes (e.g., NEC in the U.S.) for specific requirements.
Troubleshooting Common Connection Problems
- No Power/Intermittent Power:
- Check Continuity: Use a multimeter to ensure the connection is electrically sound.
- Inspect for Loose Wires: A wire may have come loose from a wire nut, crimp, or terminal.
- Look for Corrosion: Corroded connections can increase resistance and impede current flow.
- Overheating Connections:
- Incorrect Wire Gauge: The wire or connection may be too small for the current load.
- Poor Connection: A loose or poorly made connection can create high resistance, leading to heat.
- Overload: The circuit itself might be overloaded; check the circuit breaker.
- Short Circuits:
- Inadequate Insulation: Exposed conductors touching each other or a grounded surface.
- Damaged Insulation: Physical damage to the wire’s outer layer.
Comparison of Common Wire Connection Methods
| Method | Pros | Cons | Best Use Cases |
|---|---|---|---|
| Twist & Solder | Extremely strong, low resistance, permanent. | Requires soldering skills, takes time, not easily reversible. | Permanent repairs, audio equipment, automotive (high vibration). |
| Wire Nuts | Quick, easy, good insulation (if sized correctly). | Can loosen with vibration, limited to specific wire gauges. | Residential light fixtures, junction boxes. |
| Crimp Connectors | Very strong mechanical bond, vibration resistant, consistent. | Requires specific crimping tool, not easily reversible. | Automotive, marine, industrial control systems. |
| Terminal Blocks | Reusable, easy to modify, secure connections. | Can be bulky, requires stripping wires, screw-tightening. | Control panels, modular wiring, prototyping. |
| Lever-Nut Connectors | Very quick, reusable, clear visual of connection. | Can be bulky, may not be suitable for very high current. | Lighting installations, small appliance wiring, DIY projects. |
Properly connecting wires is a fundamental skill that underpins safety and reliability in any electrical project. From the crucial first step of disconnecting power to the final tests, each stage demands attention to detail. By understanding wire types, employing appropriate connection techniques, using the right tools, and diligently testing your work, you can ensure that your electrical connections are not only functional but also enduring and safe. Always remember that safety should be your primary concern, and when in doubt, consult a qualified electrician.
Frequently Asked Questions
What safety precautions should I take before I connect two wires?
Always ensure the power source is turned off at the circuit breaker before you begin any work. Wear appropriate safety gear, such as insulated gloves and safety glasses, to protect yourself from potential electrical hazards.
What are the most common methods to connect two wires securely?
The most common methods to connect two wires include using twist-on wire connectors (often called wire nuts), crimp connectors (butt splices), or soldering. Each method offers a reliable connection, but the best choice depends on the application, environment, and required durability.
What tools do I need to connect two wires effectively?
Essential tools usually include wire strippers to remove insulation, and pliers for twisting wires or securing connections. If using crimp connectors, a crimping tool is necessary, and for soldering, you’ll need a soldering iron, solder, and potentially heat shrink tubing.
How can I ensure a strong and reliable connection when joining two wires?
For a strong connection, ensure you strip the correct amount of insulation and twist the wires together tightly before applying a connector. If soldering, ensure a good mechanical bond before applying solder and heat the wire, not the solder directly, for optimal flow.
After I connect two wires, how should I insulate the joint?
Proper insulation is crucial for safety and performance after you connect two wires. You can use electrical tape, heat shrink tubing, or rely on the built-in insulation of wire nuts and crimp connectors. Heat shrink tubing, applied with a heat gun, provides a particularly robust and moisture-resistant seal.
Can I connect two wires of different gauges or types together?
While possible, it’s generally best to use connectors designed for the specific wire gauges involved to ensure a secure and safe connection. Connecting wires of significantly different types (e.g., solid to stranded) may require specific connectors or soldering for a durable bond. Always consult a professional if unsure about compatibility or complex installations.
As an Amazon Associate, I earn commission from qualifying purchases.


