How to Clean PCB Board? is a crucial maintenance task involving the removal of contaminants to ensure optimal circuit performance. This process enhances the longevity and reliability of electronic devices, preventing issues like shorts or signal interference. Understanding the right methods and tools is key to effectively cleaning these delicate components, maintaining the integrity of complex circuits.
Quick Answers to Common Questions
What’s the best way to clean a dirty PCB board?
The go-to method for cleaning a PCB board involves using 99% isopropyl alcohol (IPA) and a soft, anti-static brush or lint-free cloth. This combination is fantastic for dissolving flux residue, dirt, and oils without leaving conductive residues.
What tools and materials should I have on hand to clean my PCB board effectively?
You’ll want a bottle of 99% isopropyl alcohol, a soft-bristled brush (like an old toothbrush or an ESD-safe brush), cotton swabs for small areas, and lint-free microfiber cloths. These items will help you meticulously clean your PCB board and reach those tricky spots.
Can I use plain water to clean a PCB board if it’s really dirty?
It’s generally not recommended to use plain water to clean a PCB board because it can lead to corrosion, leave mineral deposits, or even cause short circuits if not dried perfectly. Stick to high-purity isopropyl alcohol or specialized electronics cleaners for safe and effective cleaning.
📑 Table of Contents
- Why Clean Your PCB Board? The Importance of Regular Maintenance
- Essential Tools and Materials for PCB Cleaning
- Step-by-Step Guide: How to Clean PCB Board Safely and Effectively
- Different Contaminants and Specific Cleaning Approaches
- Best Practices and Advanced Tips for Maintaining Circuit Boards
- Comparative Table of Cleaning Solvents
Why Clean Your PCB Board? The Importance of Regular Maintenance
Printed Circuit Boards (PCBs) are the backbone of almost all electronic devices, from smartphones to industrial machinery. Over time, these boards can accumulate various contaminants that degrade performance and lead to premature failure. Regular maintenance and proper cleaning are not just about aesthetics; they are vital for the operational health and extended lifespan of your electronics.
Preventing Performance Degradation
- Thermal Issues: Dust and debris can act as an insulating layer, trapping heat and causing components to overheat, which can significantly reduce their efficiency and lifespan.
- Electrical Shorts: Conductive contaminants like metal filings or even high humidity combined with dust can create unintended pathways for electricity, leading to short circuits and component damage.
- Signal Interference: Residues, especially from flux, can become conductive or corrosive over time, interfering with sensitive electrical signals and causing erratic behavior or complete failure.
Extending Component Lifespan
By removing harmful substances, you protect the delicate solder joints and integrated circuits from corrosion and stress. This proactive approach significantly extends the operational life of individual components and the entire device, saving on replacement costs and downtime.
Safety Considerations
In some applications, a contaminated PCB can pose safety risks. For instance, in high-power circuits, accumulated dust combined with moisture can potentially lead to arcing or fire hazards. Ensuring the board is clean helps mitigate such risks.
Essential Tools and Materials for PCB Cleaning
Before you begin the cleaning process, gathering the correct tools and materials is essential. Using the wrong products can damage your circuit board, so careful selection is paramount.
Cleaning Agents: Solvents and Alternatives
- Isopropyl Alcohol (IPA): A widely recommended and safe choice for electronics. Use 99% pure IPA for best results, as lower concentrations contain more water. It evaporates quickly and leaves minimal residue.
- Dedicated PCB Cleaners: Various specialized non-residue flux removers and electronic contact cleaners are available, often in aerosol form, designed for specific types of contaminants.
- Deionized Water: Can be used for water-soluble flux, but requires thorough drying to prevent corrosion.
- Acetone/Nail Polish Remover (Use with Extreme Caution): Only for specific, tough residues, and only on robust components. It can dissolve some plastics and silkscreenings. Always test in an inconspicuous area first.
Brushes and Swabs
- Soft-Bristle ESD-Safe Brushes: Essential for dislodging dust and gentle scrubbing. Ensure they are anti-static to prevent damage from electrostatic discharge.
- Cotton Swabs (Q-Tips): Ideal for precision cleaning in tight spaces and around small components. Use sparingly to avoid leaving cotton fibers.
- Microfiber Cloths: Useful for wiping down larger, less delicate areas. Ensure they are clean and lint-free.
Air Compressors and Dust Removers
- Canned Air (Dusters): Excellent for blowing away loose dust and debris. Hold the can upright to prevent propellant discharge and avoid tilting it, which can spray liquid onto the board.
- ESD-Safe Air Blowers: For professional settings, these provide a continuous, controlled stream of air without the chemical propellant of canned air.
ESD Protection Gear
Electrostatic discharge (ESD) can fatally damage sensitive electronic components. Always use:
- ESD Wrist Strap: Connects you to ground, preventing static buildup.
- ESD Mat: Provides a static-dissipative work surface.
- ESD-Safe Tools: Brushes, tweezers, and other tools that are designed not to generate or hold static charges.
Step-by-Step Guide: How to Clean PCB Board Safely and Effectively
Following a methodical approach is crucial to ensure thorough cleaning without causing damage. This technique protects your components and ensures optimal results.
Preparation and Safety First
- Disconnect Power: Always ensure the device is completely powered off and unplugged from any power source.
- Discharge Capacitors: For high-voltage boards, carefully discharge large capacitors to prevent electrical shock.
- Work in a Well-Ventilated Area: Especially when using solvents, good ventilation is crucial.
- Wear PPE: Gloves and safety glasses are recommended to protect your skin and eyes from cleaning agents. Don your ESD wrist strap and ensure it’s properly grounded.
Initial Dust and Debris Removal
Start with the least invasive methods to remove loose contaminants.
- Air Blow: Use canned air or an ESD-safe air blower to gently remove dust, lint, and loose debris. Hold the nozzle a few inches away from the board and use short bursts.
- Soft Brushing: With an ESD-safe soft-bristle brush, gently sweep away any remaining dust from surfaces and between components.
Tackling Stubborn Contaminants
For tougher grime, move on to cleaning agents.
- Apply Cleaning Agent: Dampen an ESD-safe brush or cotton swab with 99% IPA or a dedicated PCB cleaner. Do not directly spray large amounts of liquid onto the board unless the cleaner is specifically designed for that purpose and dries quickly.
- Gentle Scrubbing: Carefully scrub the contaminated areas. For flux residue, use a circular motion. For corrosion, a slightly firmer but still gentle approach might be needed. Use cotton swabs for intricate areas and around small components.
- Repeat if Necessary: For very stubborn spots, you might need to reapply the cleaning agent and scrub again.
- Inspect: Use a magnifying glass to check for any remaining residue or damage.
Drying the Board
Proper drying is critical to prevent moisture-related damage.
- Air Dry: Allow the board to air dry completely in a dust-free environment. IPA evaporates quickly.
- Canned Air (Optional): You can use canned air to help accelerate the drying process, especially in hard-to-reach areas, but ensure no liquid propellant sprays out.
- Avoid Heat: Do not use high heat sources like hair dryers, as extreme heat can damage components or solder joints.
Post-Cleaning Inspection
Once dry, perform a final visual inspection.
- Visual Check: Look for any remaining residue, damaged components, or stray fibers from swabs.
- Continuity Test (Optional): For critical boards, a basic continuity test can verify that no unintentional shorts were created.
- Reassemble: Only reassemble the device once you are certain the PCB is perfectly clean and dry.
Different Contaminants and Specific Cleaning Approaches
Different types of contamination require slightly varied cleaning techniques for optimal results.
Dust and Dirt
This is the most common contaminant. Use canned air, an ESD-safe air blower, and soft ESD-safe brushes. For sticky dust, a light wipe with IPA-dampened microfiber cloth might be necessary.
Flux Residue
Flux, used during soldering, can become sticky and corrosive over time if not properly cleaned. IPA is generally effective. For persistent non-rosin fluxes, specialized flux removers or even a quick scrub with a dedicated flux brush can be beneficial. Some water-soluble fluxes can be removed with deionized water, but extreme care must be taken with drying.
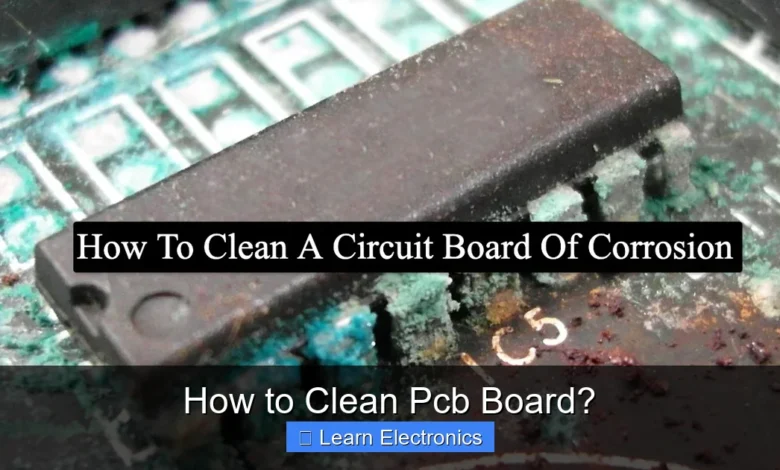
Corrosion and Oxidation
Often caused by moisture exposure, corrosion appears as green, white, or black discoloration. Mild corrosion can sometimes be removed with IPA and a brush. For severe corrosion, specialized electronic corrosion removers might be needed, or careful mechanical removal with a fiberglass pen (extremely gentle and only as a last resort), followed by neutralizing the area and applying a conformal coating if possible.
Spills and Liquid Damage
Liquid damage, especially from sugary drinks or corrosive fluids, requires immediate attention. Disconnect power immediately. For non-corrosive liquids, wash the board thoroughly with 99% IPA, using an ESD-safe brush. For corrosive liquids, a preliminary wash with deionized water followed by IPA might be necessary. Thorough drying is paramount for this type of damage.
Best Practices and Advanced Tips for Maintaining Circuit Boards
Beyond basic cleaning, incorporating these practices can significantly enhance the longevity and reliability of your electronic circuits.
Frequency of Cleaning
The frequency depends on the operating environment and usage. For devices in dusty, humid, or industrial settings, cleaning might be required every few months. For home electronics in clean environments, once a year or every few years might suffice, or only when performance issues arise.
Ultrasonic Cleaning (with caveats)
For complex boards with intricate components, ultrasonic cleaners can be highly effective. They use high-frequency sound waves to create microscopic bubbles that dislodge contaminants. However, this method requires specific equipment, an appropriate cleaning solution (usually deionized water with a surfactant or specialized electronic cleaning fluid), and careful handling to prevent damage to sensitive components like coils or crystals. It’s often best left to professionals.
Conformal Coating for Protection
After cleaning, applying a conformal coating (a thin polymeric film) can provide an additional layer of protection against moisture, dust, and chemicals. These coatings come in various types (acrylic, silicone, urethane) and are chosen based on environmental factors and application needs.
Professional Cleaning Services
For high-value, complex, or severely contaminated PCBs, consider professional cleaning services. They have specialized equipment (like ultrasonic cleaners with precise control, advanced solvents, and inspection tools) and expertise to handle delicate electronics without causing damage.
Comparative Table of Cleaning Solvents
Choosing the right solvent is critical for effective and safe PCB cleaning. Here’s a brief comparison of common options:
| Solvent | Primary Use | Evaporation Rate | Residue Left | Compatibility Notes |
|---|---|---|---|---|
| 99% Isopropyl Alcohol (IPA) | General purpose, flux residue, light oils | Fast | Minimal to None | Safe for most plastics and components. Standard choice. |
| Deionized Water | Water-soluble flux | Slow | None (if pure) | Requires extremely thorough drying to prevent corrosion. |
| Dedicated PCB Cleaner/Flux Remover | Stubborn flux, specific residues | Varies (often fast) | Minimal to None | Formulated for electronics; check specific product compatibility. |
| Acetone | Very tough residues, some glues | Very Fast | Minimal | Highly aggressive; can damage certain plastics, labels, and silkscreens. Use with extreme caution. |
Proper circuit board cleaning is an essential aspect of electronics maintenance, ensuring the longevity and optimal performance of your devices. By understanding the types of contaminants, using the right tools and techniques, and adhering to safety protocols, you can effectively revitalize your PCBs. Regular attention to this detail can prevent costly repairs and extend the life of your valuable electronics, making it a practice well worth adopting for anyone working with or relying on electronic components.
Frequently Asked Questions
What essential materials and tools do I need to clean a PCB board effectively?
You’ll typically need high-purity isopropyl alcohol (IPA) (90% or higher), a soft-bristle brush (like an old toothbrush or specialized anti-static brush), and lint-free cloths or cotton swabs. For more stubborn residues, specialized PCB cleaning solutions might be necessary to ensure thorough cleaning without damage.
How do I clean different types of contaminants, such as dust, flux residue, or corrosion, from a PCB board?
For dust, use compressed air or a soft brush. Flux residue requires IPA and a brush to gently scrub away. Corrosion is more challenging; you might need a fiberglass pen or a very fine abrasive to carefully remove it, followed by IPA cleaning, but this should be done with extreme caution to avoid damaging traces on the PCB board.
Are there any important safety precautions to consider when cleaning a PCB board?
Absolutely. Always ensure the PCB board is powered off and disconnected before cleaning. Work in a well-ventilated area, wear appropriate personal protective equipment like safety glasses and gloves, and take steps to prevent electrostatic discharge (ESD) by using an anti-static mat and wrist strap.
How often should I clean my PCB board, and what are the signs that it needs cleaning?
The frequency depends on the operating environment; boards in dusty or humid conditions will need more frequent cleaning. Signs that your PCB board needs cleaning include visible dust, grime, or corrosion, as well as unexplained performance issues like intermittent failures or overheating, which can be caused by contaminant buildup.
As an Amazon Associate, I earn commission from qualifying purchases.


