To clean car battery terminals effectively, first ensure your safety by wearing protective gear, then disconnect the negative cable followed by the positive. Apply a mixture of baking soda and water to dissolve corrosion, scrub with a wire brush or battery terminal cleaner, rinse thoroughly, and dry completely before reconnecting the positive then the negative cable. This simple yet critical maintenance can significantly improve your vehicle’s electrical performance and extend battery life.
Maintaining clean battery terminals is an essential practice for any vehicle owner. Ignoring corrosion can lead to frustrating starting issues and potentially costly electrical problems down the line. Understanding the proper approach to this task ensures both effectiveness and safety.
Quick Answers to Common Questions
Why is it important to clean car battery terminals?
Cleaning your car battery terminals is crucial because corrosion can prevent proper electrical flow, leading to starting problems and reduced battery life. Regular maintenance ensures a reliable connection and optimal performance for your vehicle.
What do I need to clean car battery terminals effectively?
To effectively clean car battery terminals, you’ll need a wire brush or specialized battery terminal brush, a wrench to loosen the clamps, and a simple solution of baking soda and water. Don’t forget safety gloves and eye protection!
How often should I clean car battery terminals?
It’s a good practice to inspect your car battery terminals every 3-6 months and clean them whenever you spot corrosion, which often looks like a white, blue, or green powdery substance. Proactive cleaning helps maintain a strong connection and prevent future starting issues.
📑 Table of Contents
- Why Cleaning Battery Terminals is Essential
- Tools and Materials You’ll Need for Effective Battery Terminal Cleaning
- Step-by-Step Guide to Cleaning Your Car Battery Terminals
- Preventing Future Corrosion
- Common Mistakes to Avoid
- When to Seek Professional Help
- Choosing the Right Cleaning Agent for Battery Terminals
- Conclusion
Why Cleaning Battery Terminals is Essential
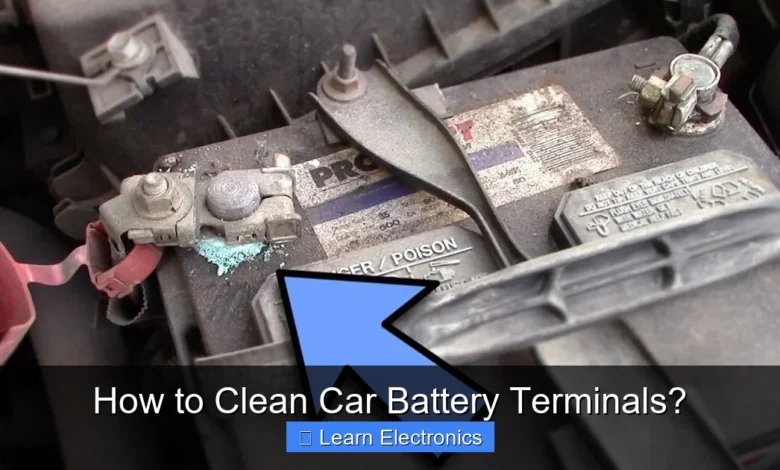
The health of your car’s electrical system hinges significantly on the condition of its battery terminals. Over time, a white, powdery, or sometimes bluish-green substance can accumulate on these terminals. This is corrosion, primarily lead sulfate, and it’s a common enemy of efficient power transfer.
Impact of Corrosion on Performance
Corrosion acts as an insulator, impeding the flow of electricity from the battery to the rest of the car’s electrical components. Even a thin layer can reduce the current available for starting the engine, leading to sluggish cranks or a complete failure to start. Beyond starting issues, corrosion can also affect the charging system, preventing the alternator from fully recharging the battery, thereby shortening its overall lifespan. It can also cause intermittent electrical problems like dimming lights or erratic accessory function.
Safety Considerations
While the primary concern is often performance, safety is equally paramount when dealing with car batteries. Corroded terminals can generate excessive heat due to increased resistance, posing a fire risk. Furthermore, the corrosive acid can damage battery cables, trays, and other under-hood components if left unchecked. Proper and regular battery terminal cleaning not only restores electrical efficiency but also mitigates potential hazards, protecting both your vehicle and yourself.
Tools and Materials You’ll Need for Effective Battery Terminal Cleaning
Before you begin the cleaning process, gathering the right tools and materials is crucial. Having everything at hand will make the task smoother, safer, and more efficient. Do not underestimate the importance of proper preparation when working with a car battery.
Essential Safety Gear
- Safety Glasses or Goggles: Battery acid can splash, and corrosive particles can fly. Eye protection is non-negotiable.
- Rubber Gloves: Protect your hands from battery acid, which is corrosive and can cause chemical burns.
- Old Clothes/Apron: Battery acid can also damage clothing, so wear something you don’t mind getting stained or ruined.
Cleaning Solutions
- Baking Soda and Water Mixture: This is the most common and effective homemade solution. Mix a tablespoon of baking soda with about a cup of water to create a paste or a pourable solution. Baking soda is alkaline and neutralizes the acidic corrosion.
- Battery Terminal Cleaner Spray: Available at auto parts stores, these sprays often come with a built-in acid indicator and are very convenient for dissolving corrosion.
- Warm Water: For rinsing off the cleaning solution and loosened corrosion.
Brushes and Scrapers
- Battery Terminal Brush: Specifically designed for this task, it typically has wire bristles for both the posts and the cable clamps. This tool is invaluable for thoroughly cleaning car battery terminals.
- Wire Brush: A general-purpose wire brush can also be used if a dedicated battery brush isn’t available, but be careful not to damage other components.
- Post Cleaner: A specialized tool for cleaning battery posts.
- Old Toothbrush (Optional): Useful for reaching tight spots or applying the baking soda paste.
- Scraper/Putty Knife (Optional): For particularly heavy, caked-on corrosion.
Other Useful Items
- Wrench Set (typically 10mm or 13mm): To loosen and tighten battery terminal nuts.
- Clean Rags or Paper Towels: For drying and wiping.
- Battery Terminal Protectant/Anti-Corrosion Spray: To apply after cleaning to prevent future buildup.
- Dielectric Grease (Optional): Can be applied to terminals before reconnection for added protection.
Step-by-Step Guide to Cleaning Your Car Battery Terminals
Properly cleaning your battery terminals is a straightforward process, but it requires attention to detail and adherence to safety protocols. Follow these steps carefully to ensure a successful outcome and prolong the life of your battery.
Prioritizing Safety First
Before you even think about touching the battery, put on your safety glasses and rubber gloves. Ensure your car is turned off, the parking brake is engaged, and the keys are removed from the ignition. This prevents any accidental starting or electrical shorts.
Disconnecting the Battery
This is a critical step, and the order matters to prevent short circuits.
- Locate the Negative Terminal: It’s usually marked with a minus (-) sign and often has a black cable connected to it.
- Loosen the Negative Terminal Nut: Use your wrench to loosen the nut on the cable clamp. You typically don’t need to remove the nut entirely; just enough to pull the clamp free.
- Remove the Negative Cable: Carefully pull the negative cable clamp off the battery post. Make sure it doesn’t accidentally touch the battery post or any other metal part of the car while you’re working. You can tuck it away or secure it with a plastic tie.
- Locate the Positive Terminal: It’s usually marked with a plus (+) sign and has a red cable.
- Loosen and Remove the Positive Cable: Follow the same procedure as the negative cable.
By disconnecting the negative cable first, you minimize the risk of accidental sparks or short circuits, as the car’s chassis is typically connected to the negative terminal.
Applying the Cleaning Solution
Once both cables are disconnected and safely tucked away, you can address the corrosion.
- Baking Soda Mixture: If using the baking soda and water paste, apply it generously to both the battery posts and the inside of the cable clamps where the corrosion is present. If using a pourable solution, carefully pour it over the corroded areas. You’ll often see it fizzing, which indicates it’s neutralizing the acid.
- Commercial Cleaner: If using a dedicated battery terminal cleaner spray, follow the product’s instructions. Spray it directly onto the corroded areas and allow it to sit for the recommended time.
Scrubbing Away Corrosion
Now it’s time to get rid of the gunk.
- Battery Terminal Brush: Use your specialized battery terminal brush to scrub both the battery posts and the inside of the cable clamps vigorously. The bristles are designed to reach all surfaces and effectively remove corrosion.
- Wire Brush/Toothbrush: For stubborn spots or tight areas, a small wire brush or an old toothbrush can be effective. Ensure all visible corrosion is removed, leaving shiny, clean metal.
- Scraper: For extremely heavy, caked-on corrosion, you might need to gently scrape some of it off with a plastic scraper before using the brush. Be careful not to damage the battery casing or posts.
This thorough scrubbing is essential to ensure good electrical contact.
Rinsing and Drying
After scrubbing, the next steps in this method involve rinsing and drying.
- Rinse: Use warm water to thoroughly rinse off the baking soda solution, dissolved corrosion, and any remaining debris from the battery posts and cable clamps. Ensure no baking soda residue is left behind, as it can be conductive.
- Dry: Use a clean rag or paper towels to dry the battery posts and cable clamps completely. Moisture can promote future corrosion, so ensure everything is bone dry.
Reconnecting the Battery
The reconnection process is the reverse of disconnection, and the order is equally important.
- Apply Protectant (Optional but Recommended): Before reconnecting, apply a thin layer of battery terminal protectant spray or dielectric grease to the clean battery posts and the inside of the cable clamps. This helps prevent future corrosion.
- Reconnect the Positive Cable: Place the positive cable clamp back onto the positive battery post. Tighten the nut securely with your wrench. It should be snug, but don’t overtighten, as this can damage the post or clamp.
- Reconnect the Negative Cable: Place the negative cable clamp back onto the negative battery post. Tighten the nut securely.
Ensure both clamps are firmly attached and don’t wiggle. Give them a gentle tug to check for security.
Preventing Future Corrosion
Cleaning your battery terminals is an excellent step, but proactive prevention is even better. Implementing a few simple measures can significantly reduce the likelihood of corrosion returning quickly and keep your battery operating at its peak efficiency for longer.
Using Anti-Corrosion Products
- Battery Terminal Grease/Spray: After cleaning and reconnecting, apply a specialized battery terminal grease or anti-corrosion spray. These products create a protective barrier that seals out moisture and oxygen, the primary culprits behind corrosion. They are typically red or green in color.
- Felt Washers: You can place anti-corrosion felt washers (impregnated with a corrosion inhibitor) over the battery posts before reconnecting the cables. These provide an additional layer of protection at the base of the terminals.
Regular Inspection Tips
Make a habit of regularly inspecting your battery terminals, perhaps during routine oil changes or tire rotations.
- Visual Check: Look for any signs of white or bluish-green buildup. The earlier you catch it, the easier it is to address.
- Cable Condition: Check the entire length of the battery cables for cracks, frayed insulation, or signs of damage. Damaged cables can also impede current flow and lead to issues.
- Battery Tray: Ensure the battery tray is clean and dry. A dirty or wet tray can also contribute to corrosion or short circuits.
Proper Battery Maintenance
Beyond the terminals, good overall battery care plays a role.
- Keep Battery Top Clean: Wipe down the top of the battery periodically with a damp cloth to remove dirt and grime, which can sometimes create conductive paths for discharge.
- Check Electrolyte Levels (if applicable): For older, non-sealed batteries, ensure the electrolyte levels are appropriate and top up with distilled water if needed.
- Ensure Secure Mounting: Make sure the battery is securely mounted in its tray. Vibrations can loosen connections and internal components, leading to issues.
Common Mistakes to Avoid
While the process of cleaning battery terminals is relatively straightforward, certain errors can lead to inefficiency, damage, or even safety hazards. Being aware of these common pitfalls can help ensure a smooth and effective maintenance task.
Ignoring Safety Precautions
One of the most dangerous mistakes is neglecting safety gear. Working with car batteries involves risks of chemical burns from acid, electrical shock, and even explosions from hydrogen gas.
- No Eye Protection: Always wear safety glasses or goggles. A splash of battery acid in the eye can cause permanent damage.
- No Hand Protection: Rubber gloves protect your skin from corrosive acid and keep your hands clean.
- Working with Live Circuits: Never attempt to clean terminals with the engine running or without disconnecting the battery first.
Improper Disconnection/Reconnection
The order in which you disconnect and reconnect battery cables is crucial to prevent short circuits and damage to your vehicle’s electronics.
- Disconnecting Positive First: Always disconnect the negative (-) cable first, then the positive (+). If you disconnect the positive first and your wrench touches a metal part of the car, it can create a short circuit.
- Reconnecting Negative First: Always reconnect the positive (+) cable first, then the negative (-). Reversing this order can also create a spark.
- Overtightening Terminals: While terminals need to be snug, overtightening can strip the threads of the battery post or crack the battery casing, leading to leaks or damage.
Using Abrasive Materials or Harsh Chemicals
While effective in removing corrosion, some materials can damage the battery or its components.
- Steel Wool: Avoid using steel wool or highly abrasive pads, as they can leave behind conductive steel fibers that could cause a short circuit.
- Acidic Cleaners: While battery corrosion is acidic, using strong acidic cleaners can exacerbate the problem or damage plastic components. Baking soda is effective because it’s alkaline and neutralizes the acid.
- Wire Brushes on Battery Casing: Only use wire brushes on the metal terminals and cable clamps, not on the plastic battery casing itself, which can be easily scratched and weakened.
When to Seek Professional Help
While cleaning car battery terminals is a DIY-friendly task, there are specific situations where it’s best to consult a professional mechanic or an automotive technician. Recognizing these instances can prevent further damage or ensure your safety.
Excessive Corrosion or Damage
If the corrosion is extremely heavy, has spread beyond the terminals to the battery tray, cables, or other under-hood components, it might indicate a more severe issue.
- Corrosion Eating Through Cables: If you notice that the corrosion has visibly eaten away at the battery cables’ insulation or copper strands, the cables themselves might need replacement, which is a job best left to professionals.
- Battery Case Damage: Cracks, bulges, or leaks in the battery case are signs of a compromised battery, potentially due to overcharging or internal issues. A professional can assess whether the battery is still safe to use or needs immediate replacement.
Persistent Starting Problems After Cleaning
If you’ve thoroughly cleaned your battery terminals and ensured they are properly connected, but you’re still experiencing starting problems (e.g., slow crank, no crank), the issue likely lies elsewhere.
- Failing Battery: The battery itself might be old or failing and unable to hold a charge. A mechanic can perform a load test to determine its health.
- Alternator Issues: The alternator might not be effectively charging the battery.
- Starter Motor Problems: The starter motor could be faulty.
- Other Electrical Gremlins: There might be parasitic draws or other complex electrical faults that require diagnostic tools and expertise to identify and fix.
Uncertainty or Discomfort
If at any point you feel uncomfortable or unsure about any step of the process, especially regarding electrical components or handling corrosive materials, it’s always safer to defer to a professional. Car batteries can be dangerous if mishandled, and safety should always be your top priority. A professional can quickly and safely assess the situation and perform the necessary maintenance or repairs.
Choosing the Right Cleaning Agent for Battery Terminals
The table below outlines common cleaning agents used for battery terminals, their properties, and ideal application scenarios. Selecting the correct solution is vital for effective corrosion removal without causing damage.
| Cleaning Agent | Type | Pros | Cons | Best Use For |
|---|---|---|---|---|
| Baking Soda & Water | Alkaline Solution | Neutralizes acid, non-toxic, inexpensive, readily available. | Requires rinsing, can be messy if not applied as a paste. | General corrosion, DIY enthusiasts. |
| Commercial Battery Terminal Cleaner Spray | Specialized Chemical | Easy application, often includes acid indicator, effective. | More expensive, may require specific disposal. | Quick cleaning, heavy corrosion, convenience. |
| Cola (e.g., Coca-Cola) | Mild Acidic (Phosphoric Acid) | Can dissolve light corrosion, readily available. | Sticky residue, not ideal for neutralizing acid, less effective. | Emergency light corrosion removal (not recommended as primary). |
| Warm Water | Neutral Solvent | Good for rinsing, dissolves loose debris. | Does not neutralize acid, ineffective on its own for heavy corrosion. | Final rinse after chemical cleaning. |
For most DIYers, the baking soda and water mixture remains the safest and most effective choice due to its ability to neutralize the corrosive acid without harsh chemicals.
Conclusion
Regularly cleaning your car battery terminals is a simple yet profoundly impactful maintenance task. By diligently following the steps outlined, you not only ensure optimal electrical conductivity for reliable starts and consistent performance but also extend the life of your battery and prevent potential safety hazards. This inexpensive and relatively quick procedure can save you from inconvenient breakdowns and costly repairs in the long run. Embrace this essential practice, and your vehicle’s electrical system will thank you with smooth, trouble-free operation.
Frequently Asked Questions
Why is it important to clean car battery terminals regularly?
Corroded car battery terminals can hinder the flow of electricity, leading to starting problems and reduced battery life. Regular cleaning ensures a strong connection, allowing your car’s electrical system to function efficiently. This preventive maintenance can save you from unexpected breakdowns and costly repairs.
What tools and materials are required to clean car battery terminals?
You’ll need safety glasses, gloves, a wire brush (or a dedicated battery terminal brush), baking soda, water, a wrench for loosening terminals, and a clean cloth. Dielectric grease is also recommended for post-cleaning protection to prevent future corrosion.
What is the safest way to clean car battery terminals?
First, ensure your car is off and wear safety gear. Disconnect the negative terminal first, then the positive. Mix baking soda with water to form a paste, apply it to the corrosion, and scrub with a wire brush until clean. Rinse with plain water, dry thoroughly, and reconnect the terminals (positive first, then negative) before applying dielectric grease.
How frequently should I clean my car battery terminals?
It’s generally recommended to inspect your car battery terminals every six months, or more often if you live in a humid climate or notice signs of corrosion. Clean them whenever you observe any build-up or green/white powdery substance, as this indicates a need for immediate attention.
As an Amazon Associate, I earn commission from qualifying purchases.


