To effectively clean battery cables, you must first ensure safety by disconnecting the battery, then apply a cleaning solution to remove corrosion, and finally protect the connections from future buildup. This essential maintenance practice enhances your vehicle’s electrical system efficiency and prolongs battery life. Neglecting this crucial task can lead to poor performance and even starting issues, making regular care of these vital components indispensable.
Quick Answers to Common Questions
What do I need to clean battery cables effectively?
You’ll want a wire brush or battery terminal cleaning tool, a baking soda and water solution, and some dielectric grease to finish the job right when you clean battery cables.
Why is it so important to clean battery cables regularly?
Cleaning your battery cables removes corrosion, which can hinder electrical flow and prevent your car from starting or charging properly. Keeping them clean ensures a strong connection and optimal performance.
How often should I check and clean my battery cables?
It’s a good idea to inspect your battery cables every few months, or whenever you perform routine maintenance like an oil change. If you spot any corrosion, it’s time to clean battery cables immediately!
📑 Table of Contents
The Critical Importance of Clean Battery Connections
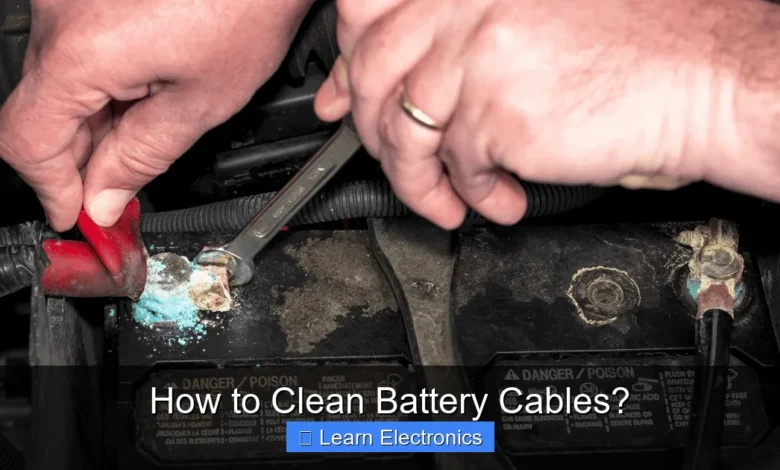
Battery cables are the lifeblood of your vehicle’s electrical system, connecting the battery to the starter, alternator, and ultimately, every electronic component. Over time, these connections can accumulate corrosion, a powdery, often colorful (blue, green, or white) substance that forms due to a chemical reaction between battery gases and the metal terminals. This buildup acts as an insulator, impeding the flow of electricity.
Impact of Corrosion on Vehicle Performance
- Starting Difficulties: The most noticeable symptom is often a slow crank or complete failure to start, as insufficient power reaches the starter motor.
- Dim Lights and Electrical Issues: Headlights may appear dim, and other electrical accessories like the radio or power windows might malfunction due to inadequate voltage.
- Reduced Battery Lifespan: A constantly struggling electrical system puts undue stress on the battery, shortening its overall service life.
- Alternator Strain: The alternator has to work harder to compensate for poor connections, potentially leading to premature failure of this expensive component.
Regular maintenance, including thorough cleaning of these connections, prevents these issues, ensuring reliable vehicle operation and extending the life of your battery and other electrical components.
Prioritizing Safety Before You Begin
Working with car batteries and electrical systems requires caution. Ignoring safety precautions can lead to serious injury or damage to your vehicle. Always prioritize safety above all else when undertaking this task.
Essential Safety Measures
- Personal Protective Equipment (PPE): Always wear safety glasses or goggles to protect your eyes from corrosive battery acid and flying debris. Heavy-duty gloves (rubber or nitrile) are also recommended to shield your hands.
- Ventilation: Work in a well-ventilated area to disperse any hydrogen gas emitted by the battery, which is highly flammable. Avoid open flames, sparks, or smoking near the battery.
- Tools: Use insulated tools where possible. Ensure your wrenches are the correct size to prevent slipping and accidental short circuits. Avoid using cracked or damaged tools.
- Vehicle Environment: Make sure the vehicle is in Park (for automatic transmissions) or Neutral (for manual transmissions) with the parking brake engaged. Turn off all accessories and the ignition.
Safely Disconnecting the Battery
This is a critical step to prevent short circuits and electrical shocks.
- Locate Terminals: Identify the positive (+) and negative (-) terminals. The positive terminal is usually marked with a plus sign and often has a red cable; the negative terminal has a minus sign and a black cable.
- Disconnect Negative First: Using a wrench, loosen the nut on the negative terminal clamp. Carefully twist and pull the cable free from the terminal, ensuring it doesn’t accidentally touch the battery post or any metal part of the car body. Tuck it away safely.
- Disconnect Positive Second: Repeat the process for the positive terminal. Once both cables are disconnected, the battery is isolated, and it’s safe to proceed with the cleaning.
Essential Tools and Cleaning Agents
Having the right equipment makes the task of cleaning battery cables efficient and effective. Most items are readily available at auto parts stores or even around your home.
Required Tools
- Battery Terminal Brush: This specialized wire brush has internal and external bristles designed to clean both the battery posts and the cable clamps.
- Wrench/Ratchet Set: For loosening and tightening the battery terminal nuts (typically 10mm, 13mm, or 1/2 inch).
- Wire Brush (General Purpose): For cleaning larger areas of corrosion on the cables themselves, if necessary.
- Clean Cloths or Rags: For wiping away debris and drying surfaces.
- Bucket and Water: For rinsing and mixing cleaning solutions.
- Safety Glasses and Gloves: As mentioned in the safety section.
- Battery Terminal Puller (Optional): Can be helpful for stubborn clamps, though usually not necessary.
Effective Cleaning Agents
- Baking Soda and Water Paste: This is the most common and safest homemade solution. Baking soda is a mild alkali that neutralizes battery acid. Mix about a tablespoon of baking soda with a small amount of water to form a thick paste.
- Specialized Battery Terminal Cleaner: Available in aerosol cans, these cleaners often contain indicators that change color when they neutralize acid. They are convenient and effective.
- Coca-Cola or Carbonated Beverages (Use with Caution): The phosphoric acid in soda can break down corrosion. However, it leaves a sticky residue that must be thoroughly rinsed off, and it’s not as effective at neutralizing acid as baking soda. Use as a last resort.
Corrosion Protection
- Battery Terminal Anti-Corrosion Spray or Grease: These products create a protective barrier that prevents moisture and gases from reaching the metal, significantly reducing future corrosion.
Step-by-Step Guide on How to Clean Battery Cables
Once you have your safety gear on and tools ready, following these steps will guide you through the process to clean battery cables thoroughly and safely.
Understanding the Process to Clean Battery Cables
- Visual Inspection: Before you start, visually inspect the battery and cables. Note the extent and location of corrosion. Check the cables for any signs of fraying, cracks, or damage to the insulation. If cables are severely damaged, cleaning alone won’t suffice, and replacement will be necessary.
- Disconnect the Battery: As detailed in the safety section, disconnect the negative (-) cable first, then the positive (+) cable. Ensure both cables are moved away from the battery terminals to prevent accidental contact.
- Prepare Cleaning Solution: If using baking soda, mix it with a small amount of water to create a thick paste. If using a commercial cleaner, have it ready.
- Apply Cleaner to Corroded Areas: Generously apply the baking soda paste or spray the commercial cleaner onto the battery terminals and the inside of the cable clamps. Let it sit for a few minutes. You’ll often see the baking soda solution fizzing as it neutralizes the acid.
- Scrub Away Corrosion: Use the battery terminal brush to scrub both the battery posts and the inside of the cable clamps. For stubborn corrosion, use a general-purpose wire brush. Ensure you clean all surfaces until they are shiny metal.
- Rinse Thoroughly: Use a small amount of clean water from your bucket to rinse off the cleaning solution and dislodged corrosion. Be careful not to let large amounts of water get into the battery cells (though modern sealed batteries minimize this risk). Dry all components thoroughly with a clean rag. Any lingering moisture can promote new corrosion.
- Inspect Cables and Terminals: After cleaning, re-examine the cables and terminals for any remaining corrosion or damage. If the cable clamps themselves are severely corroded or damaged beyond repair, they may need to be replaced.
- Apply Anti-Corrosion Protection: Once everything is clean and dry, spray a thin, even coat of anti-corrosion spray or apply a thin layer of anti-corrosion grease to the battery posts and the inside of the cable clamps. This protective layer will significantly slow down future corrosion.
- Reconnect the Battery: Reconnect the positive (+) cable first, ensuring a snug fit without over-tightening. Then, reconnect the negative (-) cable. Test the connections by trying to wiggle them; they should not move.
- Test the Vehicle: Start your vehicle. You should notice improved starting performance and a more consistent electrical system.
Preventing Future Corrosion and Maintaining Performance
While mastering the cleaning of battery cables is crucial, prevention is always better than cure. Regular preventative measures can significantly extend the time between cleanings and ensure optimal battery performance.
Preventative Measures
- Regular Inspections: Make it a habit to visually inspect your battery terminals and cables every few months, especially before winter or after long trips. Catching corrosion early makes cleaning much easier.
- Utilize Anti-Corrosion Products: Always apply anti-corrosion spray or grease after cleaning. These products form a protective barrier against the elements and battery gases.
- Proper Battery Hold-Down: Ensure your battery is securely mounted in its tray. A loose battery can vibrate, causing internal damage and potentially leading to electrolyte leakage, which promotes corrosion.
- Check Cable Integrity: Periodically check the entire length of your battery cables for any signs of wear, fraying, or damaged insulation. Damaged insulation can expose the wire to moisture and air, accelerating corrosion and creating potential short circuits.
- Ventilation: Ensure the battery compartment (if applicable) is well-ventilated to prevent the buildup of corrosive gases.
Troubleshooting Common Battery Cable Issues
Sometimes, cleaning the battery cables might not fully resolve your vehicle’s electrical problems, or you might encounter issues during the cleaning process itself. Here’s how to troubleshoot common scenarios.
When Cleaning Isn’t Enough
- Severe Corrosion: If the corrosion has eaten into the metal of the battery posts or cable clamps, creating deep pits or weakening the metal, cleaning might not restore full conductivity. In such cases, the affected components (battery, cable clamps, or entire cables) may need replacement.
- Damaged Cables: Look for cracked, frayed, or brittle insulation along the battery cables. Internal corrosion within the cable itself, hidden by the insulation, can also occur. If you suspect internal damage, the cable should be replaced.
- Persistent Electrical Issues: If your vehicle still exhibits slow cranking, dim lights, or other electrical problems after thoroughly cleaning and reconnecting the battery cables, the issue might lie elsewhere. Consider testing the battery’s charge and health, checking the alternator’s output, or inspecting the starter motor. Many auto parts stores offer free battery and charging system tests.
Battery Terminal Corrosion Types and Cleaning Effectiveness
| Corrosion Type | Appearance | Cause | Cleaning Effectiveness |
|---|---|---|---|
| White/Blue/Green Powdery | White, bluish, or greenish powder around terminals. | Battery acid reacting with copper/lead. Most common. | Highly effective with baking soda/wire brush. |
| Crystalline/Crusty | Hard, crystal-like buildup, often white/gray. | Leaking battery acid evaporating and crystallizing. | Effective with a strong brush and cleaning solution, may require scraping. |
| Black Sooty | Dark, sooty residue, often indicates arcing. | Poor connection causing electrical arcing/sparking. | Cleaning helps, but underlying loose connection must be fixed to prevent recurrence. |
Always address the root cause of corrosion, whether it’s a loose connection, an old battery, or a lack of protective measures, to ensure long-term reliability.
Conclusion
Regularly cleaning battery cables is a straightforward yet profoundly impactful maintenance task that contributes significantly to your vehicle’s reliability and longevity. By following proper safety procedures, using the right tools, and applying protective measures, you can prevent electrical issues, ensure consistent starting power, and extend the lifespan of your battery and related components. Make this simple but essential chore a routine part of your vehicle care, and you’ll enjoy a more dependable and efficient driving experience.
Frequently Asked Questions
Why is it important to clean my battery cables?
Cleaning your battery cables is crucial because corrosion can impede electrical flow, leading to starting problems and reduced battery life. Regular cleaning ensures a strong, reliable connection between your battery and the vehicle’s electrical system.
What tools and materials are essential for cleaning battery cables?
You’ll need a battery terminal brush or wire brush, baking soda, water, a wrench (to disconnect terminals), safety glasses, and rubber gloves. Dielectric grease or an anti-corrosion spray is also recommended for post-cleaning protection of your battery cables.
What are the proper safety steps when cleaning battery cables?
Always wear safety glasses and gloves, and ensure your vehicle’s ignition is off. Disconnect the negative (black) battery cable first, then the positive (red) cable, to prevent accidental short circuits. Reconnect them in reverse order: positive first, then negative.
How do I effectively remove stubborn corrosion from battery terminals and cables?
Mix a paste of baking soda and water, then apply it generously to the corroded areas. The baking soda will react with the acidic corrosion, neutralizing it and making it easier to scrub away with a wire brush or battery terminal brush. Rinse with clean water and dry thoroughly.
How can I prevent future corrosion on my battery cables after cleaning?
After cleaning and reconnecting your battery cables, apply a layer of dielectric grease or an anti-corrosion spray to the terminals and connections. This creates a protective barrier that helps prevent moisture and air from reaching the metal, significantly slowing down the corrosion process.
How often should I inspect or clean my battery cables?
It’s a good practice to inspect your battery cables for corrosion every three to six months, especially in humid climates or if you notice any starting issues. Clean them immediately if you see any signs of white, green, or blue powdery build-up on the terminals or cable ends.
As an Amazon Associate, I earn commission from qualifying purchases.


