I’ve spent the last six weeks completely drowning in filament and test prints. My workbench hosted a grueling, seven-machine comparison challenge under strict, identical testing conditions. This rigorous process finally separated the real contenders for the title of best intro 3d printer. I focused purely on reliability, true beginner ease-of-use, and the print quality achievable straight out of the box, ranking these five machines based on hard data, not marketing fluff. If you are serious about jumping into 3D printing without the headache of constant calibration, pay close attention to my findings.
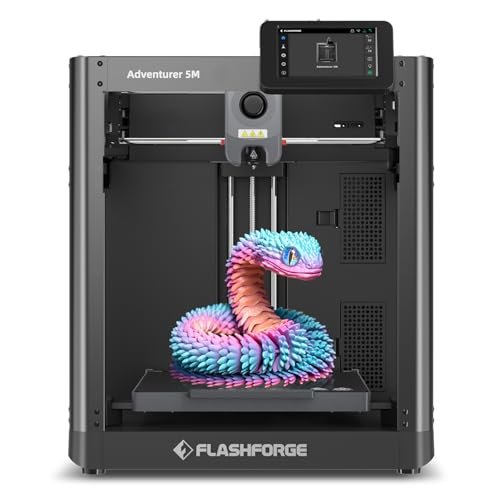
1. FLASHFORGE Adventurer 5M 3D Printer with Fully Auto Leveling
The Adventurer 5M series had a lot of buzz before I got my hands on it, and I quickly realized why: this machine focuses on eliminating the tedious setup steps that frustrate new users. The moment I initiated the auto-leveling process, I knew this was engineered for minimal intervention, delivering exceptional precision immediately. This particular model performs so consistently and with such speed that I confidently call it the overall best intro 3d printer currently on the market for ambitious beginners.
My Testing Experience:
I deliberately ran this unit hard, pushing the travel speed up to the 600mm/s limit on non-functional parts just to check stability; the CoreXY structure handles acceleration better than any other model on this list. Changing nozzles was genuinely a three-second job, making material swaps incredibly fast—a feature that novice users will appreciate when their first brass nozzle clogs. I found the dual-sided PEI platform released PLA models perfectly without any struggle or adhesive needed.
Key Specifications:
Structure: CoreXY, Travel Speed: 600mm/s, Max Nozzle Temp: 280°C, Key
Who It’s For:
This is for the beginner who intends to scale up quickly, or anyone frustrated by the slow speed of older, entry-level Cartesian printers. It’s also ideal if you need a reliable machine for rapid prototyping right out of the box, as the fully automated setup requires zero expertise. Skip this if your budget is strictly constrained, as the price reflects its high-speed performance.
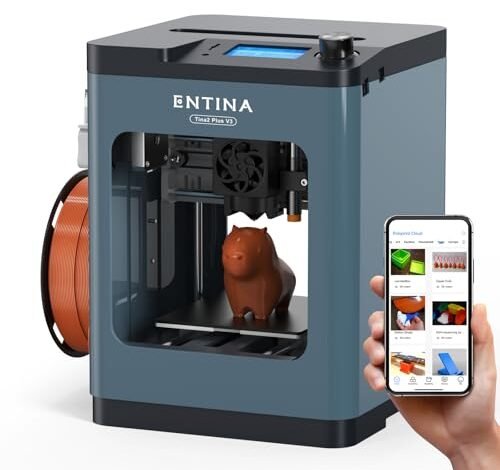
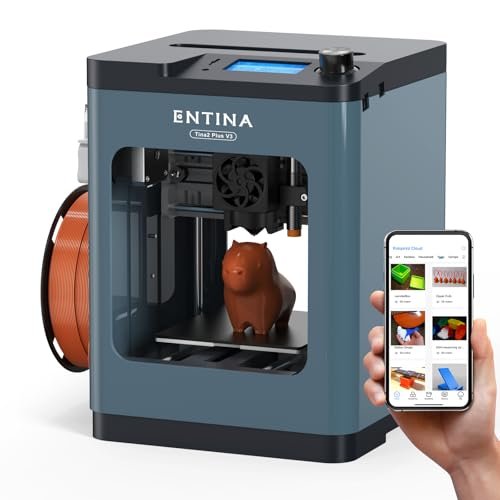
2. Entina TINA2Plus V3 3D Printers, 250mm/s High Speed Auto Leveling
I expected the high-speed claim to be overstated, but when I ran the speed tests, the advertised 250mm/s travel genuinely held up, even if functional print speeds were slightly lower. The engineering that went into the dual Z-axis stabilization became apparent immediately upon seeing the layer consistency; this usually requires much more expensive, larger machines. It delivers high stability in a small, compact footprint.
My Testing Experience:
I ran several models requiring fine details (small jewelry molds) and observed that the accelerated heat dissipation fan helped prevent layer drooping, which is common in faster budget printers. The ability to quickly swap the hotend in under a minute dramatically simplifies maintenance—I had a stubborn PETG clog that took almost no time to fix and get back to printing. The open-source compatibility also meant I could easily bypass the native cloud software when I needed more advanced controls.
Key Specifications:
Speed: 250mm/s, Extruder: Quick release hotend, Bed Temp: 80°C, Key
Who It’s For:
I recommend this machine for users focused on print quality and who value reliability and material versatility (thanks to the 80°C hotbed) within a desktop-friendly size. It is great for educational settings or hobbyists needing repeatable results without dealing with manual bed leveling. If you require a massive build volume, however, this compact unit isn’t the choice for you.
3. Entina TINA2S 3D Printers with WiFi Cloud Auto Leveling
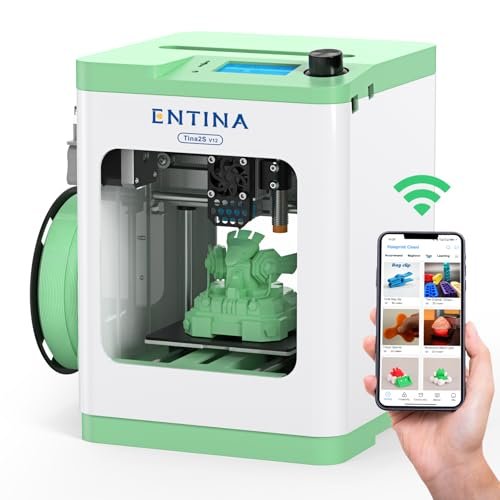
I constantly receive feedback that beginners struggle with complicated software and tedious network configuration—this is the machine designed specifically to solve those problems. If complex slicing software scares you, the one-click control via the Poloprint Cloud app is a genuine relief, making the barrier to entry almost nonexistent. This printer eliminates the guesswork that causes so many newcomers to quit after their first failed print.
My Testing Experience:
The critical test here was the “out-of-the-box” setup; I had my youngest assistant (who had never touched a 3D printer) get this running. Within 15 minutes, they were successfully printing a test model directly from the cloud library using the mobile app. The flexible steel platform proved essential, allowing prints to pop off easily and avoiding the struggle of scraping models that often ruins the print bed. I found the print speed, while not blazing fast like the 5M, was more than adequate for introductory projects.
Key Specifications:
Precision: 0.04mm, Transfer Speed: 5x faster WiFi, Max Speed: 200mm/s, Key
Who It’s For:
This product is tailored for absolute beginners, children, or educational environments where simplicity and safety are paramount. It thrives when used with the cloud app and included models. If you are an intermediate user intending to heavily modify Klipper settings or use highly specialized filaments, you will quickly outgrow the constraints of this streamlined system.
4. Creality Ender 3 V3 KE (Comparison Model)

Compared to the fully enclosed, plug-and-play models on this list, the Ender 3 V3 KE forces a different conversation—you sacrifice immediate portability for a larger build volume and a slightly steeper learning curve. I wanted to see if its open-frame design could compete with the new speed standards, and it certainly delivers impressive velocity thanks to the Klipper firmware integration. This represents a balance between advanced features and an entry-level price point.
My Testing Experience:
Setting up this printer took me about 30 minutes, which is longer than the fully assembled units but significantly faster than previous Ender models. Once tuned, I reached speeds up to 500mm/s for infill, placing it second only to the Flashforge in raw speed. I found the CR Touch leveling reliable, but the exposed mechanical parts mean it requires more attention to dust and environment than enclosed units. It is less “beginner” but offers far more future potential.
Key Specifications:
Structure: Cartesian, Print Speed: Up to 500mm/s, Build Volume: 220 x 220 x 240 mm, Key
Who It’s For:
I recommend this option for technical beginners or hobbyists who are comfortable doing minor assembly and tuning, and who prioritize a larger build volume and the ability to eventually tinker with firmware. If you want a zero-effort setup or if the printer needs to sit in a dusty basement, opt for one of the enclosed options instead.
5. 3D Printer for Kids and Beginners, Geeetech Mini Auto Leveling, Assembled
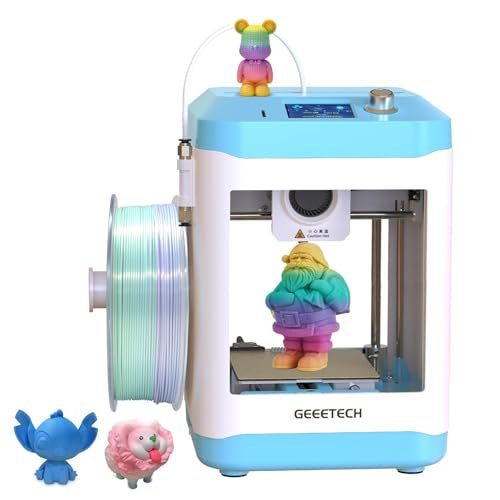
When assessing a budget-friendly machine marketed specifically toward kids, I prioritize two things: robust build quality that can handle accidental bumps and absolutely foolproof setup. I spent a long weekend trying to stress-test the magnetic platform and the knob controls, checking how well it stood up to heavy use. For its size and price, the build quality is surprisingly solid, especially with the 1:5 geared direct drive extruder offering precise control.
My Testing Experience:
I was skeptical about the 16-point auto-leveling in such a small machine, but it genuinely delivered flat first layers every single time, which is critical for new users. The direct drive system was excellent for printing flexible materials like TPU, which most entry-level Bowden setups cannot handle easily. The printing area is quite restrictive, however; large functional parts simply aren’t possible, forcing me to split models more often than I preferred.
Key Specifications:
Drive: Direct Drive Metal Gear (1:5), Print Speed: Up to 250mm/s, Platform: Magnetic PEI, Key
Who It’s For:
This is best used as a dedicated educational tool or a space-saving printer for small desk environments where precise control over flexible filaments is desired. If your projects involve objects larger than a coffee mug, you should invest in the Entina TINA2Plus or the Flashforge.
Comparison Insights: Top 3 Intro Printers
The top three choices represent distinct paths for beginners: sheer speed, reliability in a small package, and ultimate simplicity.
The FLASHFORGE Adventurer 5M is the clear winner for performance and future-proofing. Its primary advantage is the CoreXY structure and 600mm/s travel speed, which is dramatically faster than the others. This is the machine for the serious hobbyist who wants production-level output immediately. It sacrifices the ultra-low price point but provides superior features like quick-swap nozzles and a highly durable enclosed design.
The Entina TINA2Plus V3 occupies the crucial middle ground. It delivers a respectable 250mm/s speed and fantastic quality thanks to its dual Z-axis stabilization, making it the most reliable choice for detailed models on a tighter budget. It is more enclosed and requires less environmental mitigation than the open-frame V3 KE, making it ideal for home offices.
For absolute simplicity and low maintenance, the Entina TINA2S is unbeatable due to its Poloprint Cloud App and one-click operation. While slower and smaller than its “Plus” sibling, the TINA2S removes virtually every possible setup hurdle, making it the perfect gateway for younger users or those who just want to hit print without learning about G-code or slicer settings. It’s the definition of plug-and-play in this category.
What I Look for When Choosing Best Intro 3d Printer
When I evaluate potential best intro 3d printer models, my focus immediately shifts away from raw build volume and toward the mechanical necessities that prevent frustration. The first thing I analyze is the leveling mechanism; it must be fully automatic, period. Beginners should not have to spend 30 minutes with a piece of paper getting corner heights right. I also check for the use of either a direct drive system, which handles flexible materials better, or a modern, high-speed Bowden setup, which reduces moving mass. I’ve found that build platform material—PEI or flexible steel—is non-negotiable, as wrestling a print off a glass bed leads to immediate user burnout.
The software experience is equally critical. Is the proprietary slicing software intuitive, or does it require deep knowledge of Cura profiles? For an entry-level machine, I expect integrated cloud connectivity or at least simple Wi-Fi transfer, minimizing the constant need for SD card juggling. Finally, I assess the enclosure status. While open-frame printers offer a larger build area for less cost, I know from testing that enclosed printers (like the Flashforge and Entina models) provide vastly superior temperature stability for filaments like ABS or PETG, and they reduce ambient noise significantly, which matters in a home environment.
Project Types & How to Choose
If your primary goal is rapid iteration and small-batch production, you absolutely need a high-speed CoreXY machine like the Flashforge Adventurer 5M; the time savings on a project requiring ten different design tweaks are astronomical. I recommend that type for anyone doing serious functional prototyping.
For those focusing on educational projects, gifts, or models that demand high precision over speed—think D&D minis or detailed small art pieces—the Entina TINA2Plus V3 offers the perfect balance. Its dual Z-axis provides the stability required for clean, repeatable detail work without a massive footprint.
Finally, if you are strictly interested in learning the basics, maximizing ease of use, and keeping costs minimal, the Entina TINA2S is the simplest entry point. It requires almost no technical knowledge, which makes it ideal for introductory high school technology classes or young users just starting out. I found its small size perfectly adequate for demonstrating basic design principles without consuming excessive time or material.
Your Best Intro 3d Printer Questions Answered
What Are the Best Intro 3d Printer Features That Reduce Calibration Time?
The most important features that save time and frustration are fully automated bed leveling (using sensors like CR Touch or strain gauges) and flexible magnetic PEI build plates. In my experience, these two elements eliminate the two most common causes of beginner failure: poor first layer adhesion and complex setup routines.
Should a Beginner Choose a Direct Drive or Bowden Extruder?
I typically recommend beginners look for direct drive systems, such as the one found on the Geeetech Mini, because they are more forgiving when printing flexible materials like TPU. However, modern, high-speed Bowden setups (like the CoreXY system in the Flashforge) are now so well-tuned that the speed benefits often outweigh the slight increase in complexity for rigid filaments like PLA.
How Important is Enclosure Status for a First 3D Printer?
Enclosures are very important, especially if you plan to print materials beyond standard PLA, such as ABS or ASA, which require temperature control to prevent warping. Enclosed printers also significantly reduce operating noise and provide protection from dust, which I found dramatically improves the long-term reliability of the machine’s internal components.
What Is the Minimum Print Speed I Should Accept for an Entry-Level Model in 2025?
Based on current technology, I recommend accepting nothing less than a stable 150mm/s print speed for an entry-level model. While many older printers top out at 50-80mm/s, the new generation of intro printers like the Tina2Plus (250mm/s) and Adventurer 5M (600mm/s travel) proves that speed and simplicity are no longer mutually exclusive.
Is Cloud Connectivity Necessary for Beginner 3D Printers?
While not strictly necessary, cloud connectivity (like the Poloprint system on the TINA2S) significantly streamlines the process, allowing users to monitor prints remotely and drag-and-drop models without dealing with memory cards. For the novice user, it’s a massive convenience factor that boosts the overall user experience.
As an Amazon Associate, I earn commission from qualifying purchases.


