How to Reset Ryobi Battery? A common issue for power tool users, resetting a Ryobi battery typically involves draining its residual charge, allowing internal circuits to clear, and then recharging it to restore functionality. This method often resolves temporary communication glitches between the battery and the tool or charger, offering a quick fix for performance issues.
Understanding this practice can extend the life of your power packs and save you from unnecessary replacements. It’s a simple yet effective technique that every Ryobi tool owner should be familiar with.
Quick Answers to Common Questions
Why might I need to reset my Ryobi battery?
You might need to reset your Ryobi battery if it’s not charging correctly, showing unusual indicator lights, or simply not powering your tools as it should. A quick reset can often resolve minor electronic glitches.
What’s the easiest way to reset a Ryobi battery?
The simplest way to reset your Ryobi battery is often by fully discharging it through use, then allowing it to cool before fully recharging it. For some issues, simply removing the battery from the tool and charger for about 5-10 minutes can also help it reset.
Will resetting my Ryobi battery fix all problems?
While resetting your Ryobi battery can resolve many common issues, it’s not a magic fix for all problems. If the battery has physical damage, truly dead cells, or a significant internal fault, a reset might not be enough, and replacement may be necessary.
📑 Table of Contents
Understanding Common Ryobi Battery Issues
Before attempting any reset, it’s crucial to understand why a Ryobi battery might exhibit problems. Several factors can lead to a battery appearing “dead” or refusing to charge, often signaling an internal protection mechanism at play.
Common Symptoms of a Malfunctioning Battery
- Battery not charging: The charger lights indicate an error or simply fail to recognize the battery.
- Tool not powering on: Even with a seemingly charged battery, the tool remains unresponsive.
- Shortened run time: The battery discharges much faster than usual.
- Intermittent power delivery: The tool works sporadically, cutting out unexpectedly.
- Overheating: The battery becomes excessively hot during use or charging, triggering thermal lockout.
Why Batteries “Fail” or Trigger Protection
Ryobi batteries, especially the Lithium-ion (Li-ion) models, are equipped with sophisticated Battery Management Systems (BMS). This system monitors voltage, current, and temperature to prevent damage and ensure safety. When the BMS detects an anomaly, it can temporarily shut down the battery as a protective measure. Common triggers include:
- Deep Discharge: Allowing a Li-ion battery to completely deplete its charge can sometimes trigger the BMS to prevent over-discharge damage.
- Overheating (Thermal Lockout): Operating the battery in extremely hot conditions or during heavy, continuous use can cause it to overheat, leading the BMS to shut it down until it cools.
- Overcharging: While modern chargers have safeguards, persistent issues with a faulty charger or battery can sometimes trigger overcharge protection.
- Communication Errors: Sometimes, the electronic communication between the battery, charger, and tool can get out of sync, leading to misinterpretations of the battery’s state.
- Memory Effect (NiCad): Older Nickel-Cadmium (NiCad) Ryobi batteries can suffer from a “memory effect” if repeatedly charged after only being partially discharged, leading to a reduced perceived capacity. Li-ion batteries are not susceptible to this.
Safety Precautions Before You Begin
Working with any power tool battery requires a degree of caution. Prioritizing safety will prevent potential injury or further damage to your equipment.
Essential Safety Gear
- Safety Glasses: Always protect your eyes from accidental sparks or debris.
- Gloves: Protect your hands from potential heat or sharp edges.
- Insulated Tools: If you plan to manipulate terminals (though generally not recommended for a basic reset), ensure your tools are insulated to prevent short circuits.
Workspace Safety
- Ventilation: Ensure you are in a well-ventilated area, especially if dealing with batteries that might be overheating.
- Clear Work Area: Keep your workspace clean and free of flammable materials.
- Away from Water: Never work with batteries near water or in damp conditions.
- Fire Extinguisher: Have a class D fire extinguisher (for metal fires) or a general-purpose extinguisher nearby as a precaution, though highly unlikely for a simple reset.
Always refer to the manufacturer’s manual for specific safety guidelines related to your Ryobi battery and charger models.
How to Reset Ryobi Battery: A Step-by-Step Guide
This is the most direct approach to resolving many common Ryobi battery issues. This process aims to clear any internal errors or thermal lockouts that might be preventing normal operation.
Step 1: Drain the Battery Completely (If Possible)
If your battery has some residual charge, the first step is to completely drain it. This helps clear the internal memory of the battery’s control board.
- Attach the battery to a Ryobi tool, such as a drill or impact driver.
- Operate the tool continuously (without a load, or with a very light load) until the battery is completely exhausted and the tool stops working. This ensures the voltage drops below the BMS threshold, which can sometimes “kick” it out of a locked state.
- If the battery is already completely dead and won’t power a tool, skip this step.
Step 2: Remove from Tool/Charger and Let it Rest
Once drained (or if already dead), remove the battery from both the tool and the charger.
- Place the battery in a cool, dry, and well-ventilated area.
- Allow it to rest for at least 15-30 minutes, or even a few hours. This allows any thermal lockout to dissipate and the internal electronics to fully reset. Some users report success with even longer rest times (e.g., overnight).
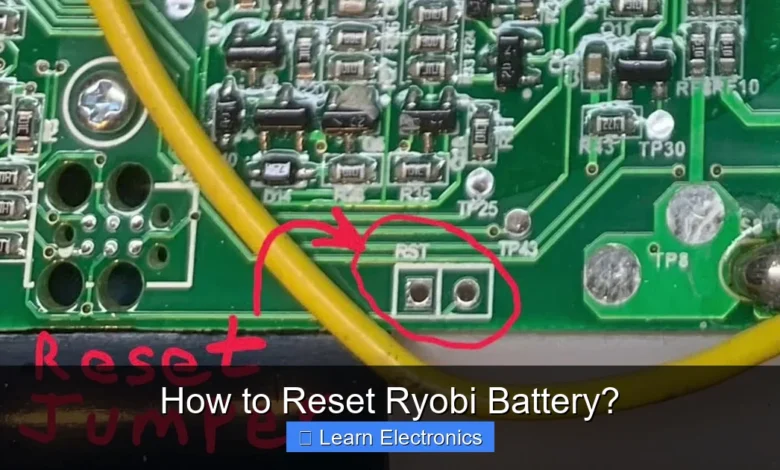
Step 3: Attempt a “Hard Reset” (If Applicable)
For some Ryobi batteries, particularly older models, a more direct reset might involve temporarily breaking the circuit. Note: This is generally not recommended for Li-ion batteries due to the risk of damage and should only be attempted if other methods fail and you are comfortable with electronics. Always proceed with extreme caution and never short the terminals.
- Carefully inspect the battery pack. Some older packs might have easily accessible screw terminals on the casing that connect to the battery cells.
- If accessible, you might carefully loosen these screws to momentarily disconnect the internal circuit from the external terminals, then retighten them. This effectively “reboots” the internal controller.
- Warning: Never try to open a sealed battery pack, especially a Li-ion one. This can be extremely dangerous and can damage the battery or cause a fire. For newer Li-ion packs, the rest period in Step 2 is typically the primary “reset” method.
Step 4: Re-charge and Test
After the rest period (and any optional hard reset), it’s time to attempt recharging.
- Place the battery back onto a functional Ryobi charger.
- Observe the charger’s indicator lights. Ideally, it should initiate a normal charging cycle.
- If it begins charging, let it complete the full cycle.
- Once fully charged, test the battery in a Ryobi tool to confirm it powers on and operates correctly.
Beyond the Basic Reset: Alternative Revitalization Techniques
Sometimes, a simple reset isn’t enough, especially if the battery has been dormant for a long time or suffered a deep discharge beyond what the BMS can easily recover from. These methods are for specific scenarios and require careful consideration.
The “Trickle Charge” for Deeply Discharged Li-ion Batteries
A deeply discharged Li-ion battery might have its voltage drop so low that a standard smart charger refuses to recognize it, deeming it unsafe to charge. Some older, simpler chargers might attempt to “trickle charge” it back to a safe voltage. However, for most modern Ryobi Li-ion batteries and smart chargers:
- Place the deeply discharged battery on the charger.
- If the charger shows an error, try removing and re-inserting the battery several times. Sometimes, this can “wake up” the BMS.
- A common (and slightly risky) trick involves momentarily connecting the dead battery in parallel with a fully charged Ryobi battery of the same voltage (e.g., 18V to 18V) using jumper wires, for a few seconds. This provides a small voltage boost to the dead battery, potentially raising its voltage just enough for the smart charger to recognize it. Extreme caution is advised, ensuring correct polarity and brief contact to avoid excessive current flow or short circuits. This is an advanced technique and can be dangerous if not performed correctly.
Deep Cycling for NiCad/NiMH Batteries
For older Ryobi NiCad or NiMH batteries suffering from memory effect, a deep cycle can sometimes restore capacity:
- Fully charge the battery.
- Discharge it completely using a tool until it stops.
- Repeat this charge-discharge cycle 2-3 times. This helps to recondition the battery cells.
Remember, Li-ion batteries do not benefit from deep cycling and should not be fully discharged regularly.
Proactive Maintenance for Optimal Battery Health
Prevention is always better than cure. Adopting good battery maintenance habits can significantly extend the lifespan of your Ryobi power packs and reduce the need for resets.
Proper Storage Practices
- Ideal Charge Level: Store Li-ion batteries with a partial charge (around 40-60%) if they will be unused for an extended period. Storing them fully charged or completely depleted can degrade cell health over time.
- Temperature Control: Store batteries in a cool, dry place, away from direct sunlight, extreme heat, or freezing temperatures. Extreme temperatures accelerate degradation.
- Out of the Tool/Charger: Remove batteries from tools and chargers when not in use for long periods.
Smart Charging Habits
- Use the Right Charger: Always use the genuine Ryobi charger designed for your battery model.
- Avoid Overcharging: Modern smart chargers will stop charging once the battery is full. However, avoid leaving batteries on the charger indefinitely after they’ve reached full capacity, as continuous trickle charging can still generate heat.
- Charge in a Moderate Environment: Charge batteries at room temperature. Charging in very hot or very cold conditions can stress the cells.
Avoiding Extreme Temperatures and Overuse
- Don’t Overwork: Avoid pushing your tools and batteries to their absolute limit for extended periods, especially in demanding applications. This can cause excessive heat buildup and trigger thermal lockout.
- Let it Cool: If a battery feels hot after heavy use, allow it to cool down naturally before placing it on the charger. Charging a hot battery can be detrimental.
- Use According to Capacity: Match the battery’s capacity (Ah) to the task. Larger capacity batteries handle heavier loads better and generate less heat for the same task.
When to Consider a Replacement vs. How to Reset Ryobi Battery
While learning how to reset Ryobi battery can be a valuable skill, there comes a point where a battery has reached the end of its useful life, and a reset simply won’t suffice. Recognizing these signs helps you make an informed decision.
Signs of Irreversible Damage
- Physical Damage: Any visible cracks, swelling, punctures, or leakage from the battery pack indicate severe internal damage. These batteries are a fire hazard and should be immediately taken out of service and disposed of properly.
- Consistent Failure to Charge: If, after multiple attempts at a reset and trying different chargers, the battery consistently refuses to charge, it likely has internal cell failure.
- Rapid Discharge After Full Charge: If a battery charges fully but loses its charge almost immediately, or provides very minimal runtime, its internal cells have degraded to an irreparable state.
- Battery Overheats Excessively: While some warmth during charging/heavy use is normal, if the battery consistently gets dangerously hot to the touch very quickly, it’s a sign of internal shorting or severe cell imbalance.
Cost-Benefit Analysis
When deciding whether to persist with revitalization attempts or opt for a new battery, consider these points:
| Factor | Consider Reset/Revitalization | Consider Replacement |
|---|---|---|
| Issue Type | Intermittent power, charger error, short-term lockout. | No charge, rapid drain, physical damage, excessive heat. |
| Battery Age | Relatively new (1-3 years), well-maintained. | Old (4+ years), heavily used, past warranty. |
| Time & Effort | Willing to spend time on troubleshooting. | Need immediate, reliable power; no time for repair attempts. |
| Safety Risk | Minimal (following precautions). | High (for damaged batteries). Prioritize safety. |
| Cost Effectiveness | Free, potentially saves battery. | Investment in new battery, but ensures performance and safety. |
Ultimately, if a battery shows consistent signs of severe degradation or physical damage, it’s safer and more practical to invest in a new, genuine Ryobi replacement. Modern Ryobi Li-ion batteries offer significant improvements in power, run time, and longevity, making them a worthwhile upgrade when an old battery fails.
Mastering the technique of resetting your Ryobi battery can be a valuable skill, saving you time and money by extending the life of your power tool accessories. By understanding the common causes of battery issues, adhering to safety protocols, and implementing the step-by-step reset process, you can often bring a seemingly dead battery back to life. However, it’s equally important to recognize when a battery has truly run its course and to practice good maintenance habits to prevent future problems. With proper care, your Ryobi batteries will continue to power your projects reliably for years to come.
Frequently Asked Questions
What does “resetting” a Ryobi battery actually mean?
For most Ryobi batteries, there isn’t a formal “reset” button or function. When people refer to resetting a Ryobi battery, they usually mean performing troubleshooting steps to resolve minor issues or cycling the battery to potentially improve its performance. This often involves fully discharging and recharging the battery or addressing temperature-related problems.
How can I troubleshoot a Ryobi battery that isn’t charging or powering a tool?
If your Ryobi battery isn’t working, first ensure it’s properly seated in the charger or tool and check for any debris. Verify that the charger is plugged in and functioning, and allow the battery to cool down or warm up to room temperature if it’s too hot or cold. Sometimes, simply fully draining the battery and then recharging it can help resolve minor glitches.
Is there a physical reset button on a Ryobi battery?
No, Ryobi batteries do not feature a physical reset button. The internal electronics manage the battery’s state and protection functions automatically. Any perceived “reset” typically comes from the battery’s internal protection circuits recovering after being over-discharged, overheated, or from following general troubleshooting steps.
When should I consider replacing my Ryobi battery?
You should consider replacing your Ryobi battery when it consistently fails to hold a charge, drains very quickly even after proper charging, or if it shows signs of physical damage like bulging or leaking. Batteries naturally degrade over time, and after several years of use, their capacity will diminish significantly, indicating it’s time for a new one.
As an Amazon Associate, I earn commission from qualifying purchases.


