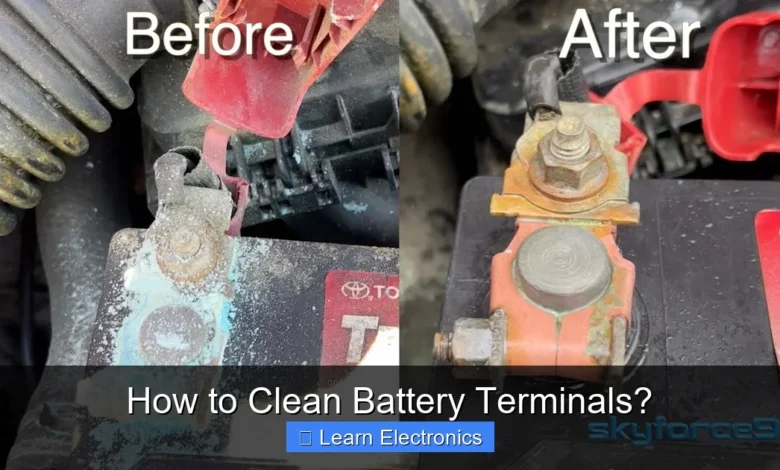
How to Clean Battery Terminals? This vital maintenance task involves safely disconnecting your battery, removing corrosive buildup from the terminals and posts, and then reconnecting everything securely. Performing this method regularly ensures optimal electrical flow and extends the lifespan of your vehicle’s battery. This approach is essential for preventing common electrical issues and maintaining reliable performance.
Prime Day Pick
Limited-time Prime Day price. Check current discount on Amazon.
Corrosion on battery terminals is a common sight and a significant impediment to your battery’s efficiency. Understanding why it occurs and how to address it properly is a fundamental aspect of vehicle or electronics maintenance. This guide will walk you through the necessary steps, tools, and best practices to keep your battery terminals in pristine condition.
Quick Answers to Common Questions
What tools do I need to clean battery terminals effectively?
To properly clean battery terminals, you’ll want a wire brush or a specialized battery terminal cleaning tool, baking soda mixed with water for a DIY cleaner, and protective gear like gloves and eye protection.
Prime Day Pick
Limited-time Prime Day price. Check current discount on Amazon.
Why is it so important to clean battery terminals regularly?
Cleaning battery terminals removes corrosion, which acts as an insulator and restricts the flow of electricity, making it harder for your car to start and potentially shortening your battery’s lifespan. Keeping them clean ensures a strong connection!
Prime Day Pick
Limited-time Prime Day price. Check current discount on Amazon.
How often should I clean my battery terminals?
It’s a good practice to inspect your battery terminals every few months for signs of corrosion. A thorough cleaning is usually needed once or twice a year, or whenever you notice significant buildup, to maintain optimal performance.
📑 Table of Contents
- Why Cleaning Battery Terminals is Crucial
- Essential Tools and Materials for Battery Terminal Cleaning
- Step-by-Step Guide to Cleaning Battery Terminals
- Common Mistakes to Avoid During Battery Maintenance
- Types of Corrosion and Their Prevention
- Maintaining Clean Battery Terminals: Schedule and Best Practices
- Conclusion
Why Cleaning Battery Terminals is Crucial
Battery terminals are the direct link between your battery and your vehicle’s electrical system. Any obstruction on these connection points can severely impact performance. Corrosion acts as an insulator, hindering the flow of electricity and leading to a cascade of problems.
The Impact of Corrosion
Corrosion, typically appearing as a white, blue, or green powdery substance, is often caused by hydrogen gas escaping from the battery and reacting with the metal terminals. This buildup creates resistance, which can lead to:
- Reduced Power Delivery: Your starter motor may receive insufficient power, resulting in slow cranks or difficulty starting, especially in cold weather.
- Charging Issues: The alternator might struggle to properly charge the battery, potentially leading to a drained battery and an illuminated battery warning light on your dashboard.
- Damage to Electrical Components: Poor electrical connections can cause voltage drops and spikes, which may damage sensitive electronic components in your vehicle or device.
- Decreased Battery Lifespan: A battery constantly struggling with resistance will work harder, leading to premature failure.
Signs Your Terminals Need Attention
Keep an eye out for these indicators that suggest it’s time for terminal maintenance:
- Visible powdery or crusty buildup on the battery posts or terminals.
- Difficulty starting your vehicle or appliance.
- Dim headlights or interior lights.
- A noticeable sulfur or rotten egg smell around the battery (indicating potential overcharging or a failing battery).
- Flickering electronics.
Essential Tools and Materials for Battery Terminal Cleaning
Before you begin the cleaning task, gather all the necessary supplies. Having everything at hand will make the process smoother and safer.
Safety First: Protective Gear
Battery acid is corrosive and batteries can produce explosive gases. Prioritize safety with these items:
- Safety Glasses or Goggles: Essential to protect your eyes from acid splashes or flying debris.
- Rubber Gloves: To shield your hands from battery acid and cleaning solutions.
- Old Clothes/Apron: To protect your clothing from acid splashes.
Cleaning Agents and Tools
Here’s what you’ll need for the cleaning procedure:
- Battery Terminal Brush: A specialized brush with wire bristles designed to clean both battery posts and cable clamps.
- Baking Soda: A common household item that neutralizes battery acid.
- Water: For rinsing after neutralizing the acid.
- Wire Brush (optional): For more stubborn corrosion, a small, stiff wire brush can be helpful.
- Post Protector/Anti-Corrosion Spray: A dielectric grease or specialized spray to prevent future corrosion.
- Wrenches: Typically 10mm or 13mm for disconnecting battery terminals.
- Clean Rags or Paper Towels: For wiping and drying.
- Battery Tester (optional): To check battery voltage before and after cleaning.
Step-by-Step Guide to Cleaning Battery Terminals
Follow these steps carefully to ensure a safe and effective cleaning process. Remember, safety is paramount.
Disconnecting the Battery Safely
- Park Safely and Turn Off Engine: Ensure your vehicle is off and in park with the parking brake engaged. Remove the key from the ignition.
- Locate the Battery: It’s usually under the hood, but sometimes in the trunk or under a seat.
- Wear Safety Gear: Put on your safety glasses and rubber gloves.
- Identify Terminals: Locate the negative (-) terminal (usually marked with a minus sign and a black cable) and the positive (+) terminal (marked with a plus sign and a red cable).
- Disconnect the Negative Terminal FIRST: Using your wrench, loosen the nut on the negative terminal clamp. Wiggle and remove the negative cable, ensuring it doesn’t touch any metal parts of the car. Insulate it with a rag if necessary. Always disconnect the negative terminal first to avoid accidental short circuits.
- Disconnect the Positive Terminal SECOND: Repeat the process for the positive terminal. Once both cables are disconnected, make sure they are clear of the battery posts.
The Cleaning Process
- Inspect for Damage: Check the battery case for cracks, leaks, or swelling. If you find any, the battery may need replacement.
- Apply Baking Soda Paste: Mix a few tablespoons of baking soda with a small amount of water to create a thick paste. Apply this paste generously to the corroded terminals and battery posts. The baking soda will react with the sulfuric acid, neutralizing it (you might see fizzing).
- Scrub the Terminals: Use your battery terminal brush to scrub away the corrosion from both the battery posts and the inside of the cable clamps. Work thoroughly to remove all traces of the white, blue, or green substance.
- Rinse and Dry: Once scrubbing is complete, rinse the posts and terminals with clean water. A spray bottle can be useful here. Ensure no water enters the battery cells. Immediately dry everything completely with a clean rag or paper towel. Moisture can promote new corrosion.
Reconnecting and Protecting
- Apply Post Protector: Once the posts and terminals are dry and clean, apply a thin layer of dielectric grease, petroleum jelly, or a specialized anti-corrosion spray to the battery posts and the inside of the cable clamps. This creates a barrier against moisture and air, preventing future corrosion.
- Reconnect the Positive Terminal FIRST: Place the positive (+) cable clamp back onto the positive battery post. Tighten the nut securely with your wrench. It should be snug, but do not overtighten.
- Reconnect the Negative Terminal SECOND: Repeat for the negative (-) terminal.
- Verify Connections: Give both cables a gentle tug to ensure they are firmly attached and won’t come loose during driving.
- Dispose of Waste: Properly dispose of any rags or paper towels used during the cleaning.
Common Mistakes to Avoid During Battery Maintenance
While cleaning terminals is straightforward, certain missteps can lead to injury or damage. Awareness of these common errors will enhance your safety and the effectiveness of the process.
Ignoring Safety Precautions
The most dangerous mistake is neglecting safety gear. Battery acid can cause severe burns, and hydrogen gas produced by batteries is highly flammable. Always wear eye protection and gloves. Avoid working in enclosed spaces without ventilation, and never smoke or use open flames near a battery.
Improper Disconnection/Reconnection
Disconnecting the positive terminal first, or reconnecting the negative terminal first, can create a dangerous short circuit. This can spark, damage the battery, or harm your vehicle’s electrical system. Always disconnect negative first, then positive. Reconnect positive first, then negative.
Over-tightening Terminals
While terminals need to be snug, over-tightening the clamps can damage the battery posts, potentially leading to internal damage or even cracks in the battery casing. This can create leaks or future connection problems. Tighten until the clamp is firm and doesn’t wiggle, but avoid excessive force.
Types of Corrosion and Their Prevention
Corrosion isn’t always the same; its appearance can give clues about its origin. Understanding these types helps in effective prevention.
White/Gray Corrosion
This is the most common type, often a result of hydrogen gas escaping from the battery vents and reacting with the copper in the terminal clamps. It’s often harmless to the battery itself but inhibits electrical flow.
Blue/Green Corrosion
This type often indicates the presence of copper sulfate, suggesting a reaction between battery acid and the copper in the cables or terminals. It can be more stubborn to remove and might point to a slightly more aggressive acid leak or venting.
Long-Term Prevention Strategies
- Terminal Protectors: As mentioned, dielectric grease or anti-corrosion sprays create a barrier. Felt washers placed under the terminals can also absorb any escaping gases.
- Regular Inspection: Periodically check your battery terminals, especially during routine oil changes or maintenance checks. Early detection makes cleaning easier.
- Maintain Battery Health: Ensure your battery is properly charged and that your charging system (alternator) is functioning correctly. Overcharging or undercharging can both contribute to corrosion.
- Clean Environment: Keep the battery top clean and free of dirt and debris, which can trap moisture and accelerate corrosion.
Maintaining Clean Battery Terminals: Schedule and Best Practices
Regular maintenance of your battery terminals is an investment in your vehicle’s reliability and battery longevity. Establishing a routine helps prevent issues before they arise.
Recommended Cleaning Frequency
The frequency for this cleaning technique depends on your driving conditions, climate, and battery age. Generally:
- Every Six Months: For most drivers, a semi-annual inspection and cleaning during seasonal changes (e.g., spring and fall) is a good practice.
- Annually: If your battery is relatively new and you live in a mild climate with minimal corrosion, once a year might suffice.
- More Frequently: If you live in a hot climate, drive an older vehicle, or notice recurring corrosion, checking every 3-4 months is advisable.
- At First Sign of Corrosion: Don’t wait for your scheduled cleaning if you spot any buildup. Address it immediately.
Beyond Just Cleaning
The practice of cleaning terminals is part of a broader battery maintenance strategy:
- Check Battery Voltage: Use a multimeter to check your battery’s voltage regularly. A healthy 12V battery should read around 12.6V when fully charged and the engine is off.
- Inspect Battery Tray and Hold-Down: Ensure the battery is securely held in its tray. Vibrations can damage the battery internally and loosen connections.
- Check Electrolyte Levels (if applicable): For older, non-sealed batteries, ensure the electrolyte levels are between the upper and lower markers. If low, top up with distilled water (never tap water).
- Examine Battery Cables: Look for frayed, cracked, or damaged insulation on the battery cables themselves. Damaged cables should be replaced professionally.
Here’s a quick reference table for common battery issues and maintenance tips:
| Issue | Common Cause | Maintenance Tip | Frequency |
|---|---|---|---|
| White/Gray Corrosion | Hydrogen gas venting, acid reaction | Baking soda clean, anti-corrosion spray | Every 6 months / As needed |
| Slow Cranking | Corrosion, low charge, failing battery | Clean terminals, check voltage, charge battery | As needed |
| Dim Lights | Corrosion, low charge, alternator issue | Clean terminals, check charging system | As needed |
| Loose Terminals | Vibration, improper tightening | Tighten connections (correct torque) | Every 6 months |
| Low Electrolyte (non-sealed) | Evaporation, heat | Top up with distilled water | Every 3-6 months |
Conclusion
Mastering the technique for cleaning battery terminals is a simple yet impactful skill for any vehicle owner or electronics enthusiast. This crucial upkeep ensures a reliable power supply, prevents frustrating breakdowns, and significantly extends the life of your battery and related electrical components. By following the detailed steps outlined in this guide, prioritizing safety, and integrating regular checks into your maintenance routine, you can keep your battery connections clean, secure, and performing optimally. Don’t underestimate the power of a clean connection – it’s the foundation of a healthy electrical system.
Frequently Asked Questions
Why is it important to clean battery terminals?
Cleaning battery terminals is crucial because corrosion, which often appears as a white or bluish powder, can impede the flow of electricity from your battery. This reduced electrical conductivity can lead to starting problems, diminish the performance of your vehicle’s electrical system, and ultimately shorten your battery’s lifespan. Regular cleaning ensures a strong, reliable connection and optimal power delivery.
What tools and materials do I need to clean battery terminals?
To safely clean battery terminals, you’ll need a few essential items. Gather a battery terminal brush, a wrench to disconnect the terminals, and a paste made from baking soda and water to neutralize acid and scrub away corrosion. Additionally, safety gear like gloves and eye protection is highly recommended to protect yourself during the process.
What’s the best way to clean battery terminals safely?
Always begin by wearing safety glasses and gloves, then disconnect the negative battery terminal first, followed by the positive terminal. Apply the baking soda paste to the corroded areas and thoroughly scrub with a battery brush until all corrosion is removed. Rinse the terminals with clean water, dry them completely, and then reattach the positive terminal first, followed by the negative, ensuring each connection is tight and secure.
How often should I clean my car battery terminals?
It’s a good practice to inspect your car battery terminals every few months, perhaps during routine maintenance like an oil change, to check for corrosion. If you notice any signs of buildup, such as a white or bluish powdery substance, it’s time for a thorough cleaning. Environmental factors and driving conditions can influence how quickly corrosion develops on the battery terminals.
As an Amazon Associate, I earn commission from qualifying purchases.


