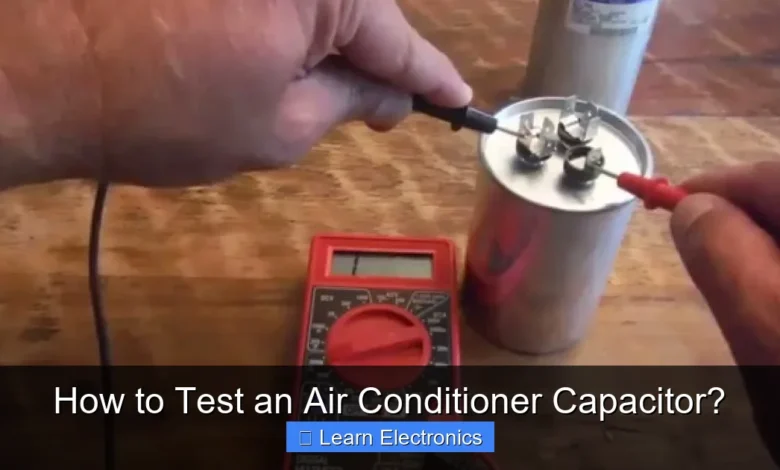
How to Test an Air Conditioner Capacitor? This essential maintenance task involves using a multimeter to measure the component’s capacitance and comparing it to the manufacturer’s specifications. Understanding this method helps diagnose common AC problems, potentially saving you from costly service calls.
The process of assessing your AC capacitor’s health is straightforward with the right tools and safety precautions. It’s a key step in troubleshooting when your air conditioner isn’t cooling efficiently or fails to start.
Quick Answers to Common Questions
What’s the very first thing I *must* do before testing an air conditioner capacitor?
Safety is paramount! Always turn off all power to your AC unit at both the thermostat and the breaker box, then carefully discharge the air conditioner capacitor using an insulated screwdriver before you touch anything.
What specific tool do I need to accurately test an air conditioner capacitor?
You’ll need a multimeter with a capacitance (µF) setting to accurately test an air conditioner capacitor. This will allow you to measure its capacitance and compare it to the label’s specifications.
Can I tell if my air conditioner capacitor is bad just by looking at it?
Sometimes! A swollen top or visible signs of leakage are strong indicators of a failing air conditioner capacitor. However, for a truly definitive answer, you’ll still need to perform an actual test with a multimeter.
📑 Table of Contents
Understanding Your AC Capacitor and Its Role
The air conditioner capacitor is a vital electrical component, often described as a temporary battery that stores an electrical charge and then releases it to give your AC unit’s fan and compressor motors the necessary boost to start and run efficiently. Without a properly functioning capacitor, these motors may struggle to start, run intermittently, or not operate at all, leading to poor cooling performance or complete system failure.
Types of AC Capacitors
- Run Capacitors: These are continuously in the circuit while the motor runs, providing a steady electrical charge to maintain efficiency. They typically have a lower capacitance value.
- Start Capacitors: Used only for a brief moment to provide an initial surge of power to help the compressor motor overcome its starting inertia. They have a higher capacitance value and are often paired with a relay to disconnect them once the motor is running.
- Dual Capacitors: Common in residential AC units, these combine both run and fan motor functions into a single unit, featuring three terminals: Herm (compressor), Fan (outdoor fan motor), and Common (power input).
Common Signs of a Failing Capacitor
Recognizing the symptoms of a failing capacitor can help you act quickly. Look out for:
- AC Unit Not Starting: The most obvious sign. You might hear a humming sound from the outdoor unit, but the fan blades or compressor don’t turn.
- Outdoor Fan Not Spinning: The compressor might be running, but the fan unit outdoors isn’t moving, causing the unit to overheat.
- Warm Air from Vents: The compressor might not be engaging, or is struggling, resulting in the system blowing warm air.
- AC Cycles On and Off Frequently: The capacitor might be too weak to maintain continuous operation.
- Visible Swelling or Leaking: A bulging top or visible fluid leakage from the capacitor’s casing is a clear indicator of failure.
Safety First: Preparing for Capacitor Testing
Working with electrical components, especially those that store a charge, requires strict adherence to safety protocols. Neglecting these steps can lead to severe electrical shock or injury.
Essential Safety Gear
Before you begin, ensure you have:
- Insulated Gloves: To protect against electrical shock.
- Safety Glasses: To protect your eyes from potential sparks or debris.
- Rubber-Soled Shoes: Provides an additional layer of insulation.
Disconnecting Power and Discharging the Capacitor
This is the most critical safety step when performing any assessment of an AC capacitor:
- Turn Off Power at the Thermostat: Set your thermostat to “Off.”
- Shut Off Power at the Breaker: Locate your home’s main electrical panel and turn off the circuit breaker that supplies power to your outdoor AC unit. This ensures no electricity reaches the unit.
- Access the Outdoor Unit: Remove the service panel from your outdoor AC unit, usually held by a few screws.
- Identify the Capacitor: It’s typically a cylindrical component, often located near the control board.
- Discharge the Capacitor: Even after power is cut, capacitors can hold a significant charge.
- Using an insulated screwdriver with a metal shaft, carefully touch the metal shaft simultaneously to the “Herm” and “Common” terminals (for dual capacitors) or across the two terminals (for single capacitors). You may see a spark, which indicates the charge has been released.
- Repeat this process for the “Fan” and “Common” terminals on dual capacitors.
- Always assume it’s charged until discharged. Do not touch terminals with bare hands.
Tools You’ll Need for Capacitor Testing
Having the right tools is essential for accurate and safe capacitor testing.
Multimeter with Capacitance Setting
A digital multimeter (DMM) with a capacitance (µF or microfarad) function is indispensable for this task. Ensure your multimeter is set to read capacitance in microfarads (µF).
- Digital Multimeter: Most modern DMMs include a capacitance testing feature.
- Appropriate Range: Make sure the meter’s range can accommodate the expected capacitance values (e.g., 30-70 µF for compressor run capacitors).
Screwdrivers and Needle-Nose Pliers
- Insulated Screwdriver: For safely discharging the capacitor.
- Standard Screwdrivers: For removing the AC unit’s access panel.
- Needle-Nose Pliers: To gently disconnect wires from the capacitor terminals.
Step-by-Step Guide: How to Test an Air Conditioner Capacitor
Once safety precautions are observed and tools are ready, you can proceed with the capacitance check. This methodical approach ensures accuracy.
Locating the Capacitor
The capacitor is typically found within the electrical compartment of your outdoor AC unit, often a shiny silver or black cylinder. Dual capacitors will have three terminals (HERM, FAN, COMMON), while single capacitors have two.
Disconnecting Wires and Discharging (Reiteration)
Carefully note where each wire connects to the capacitor terminals before disconnecting them. Taking a photo can be helpful. Using needle-nose pliers, gently pull the insulated wire connectors off the terminals. After disconnecting all wires, re-discharge the capacitor using an insulated screwdriver, just to be absolutely safe.
Setting Up Your Multimeter
- Turn on your digital multimeter.
- Set the dial to the capacitance (µF) setting. It might be labeled with a microfarad symbol (µF) or ‘CAP’.
- If your multimeter has manual ranging, select a range that is higher than the capacitor’s rated value (e.g., if the capacitor is 40 µF, set the range to 200 µF).
- Insert the black test lead into the “COM” (common) jack and the red test lead into the jack labeled for capacitance or ohms (Ω), usually marked with µF.
Performing the Capacitance Test
The actual testing process involves touching the multimeter probes to the capacitor terminals.
- For a single capacitor: Place one multimeter probe on each of the two terminals.
- For a dual capacitor:
- Test the “Herm” (compressor) terminal with the “Common” terminal.
- Then, test the “Fan” terminal with the “Common” terminal.
- Hold the probes steady until the multimeter displays a stable reading. This may take a few seconds.
Interpreting the Results
The reading on your multimeter needs to be compared to the capacitor’s rated microfarad (µF) value, which is usually printed on its label. Capacitors also have a tolerance level, typically +/- 5% or +/- 10%.
For example, if a capacitor is rated at 40 µF +/- 5%, its acceptable range would be between 38 µF (40 – 5%) and 42 µF (40 + 5%).
What the Readings Mean: Troubleshooting and Next Steps
Interpreting your multimeter’s display correctly is key to determining if your capacitor is good or needs replacement.
Acceptable Readings
If your multimeter reading falls within the acceptable tolerance range of the capacitor’s rated µF value, the capacitor is likely in good working order. For instance, a 50µF +/- 5% capacitor should read between 47.5µF and 52.5µF. If it’s within this, the capacitor is likely not the cause of your AC issues.
Low or Zero Readings (Bad Capacitor)
A reading significantly below the rated value, or a reading of zero or near zero, indicates a “weak” or “dead” capacitor. This is a common failure mode where the capacitor has lost its ability to store and release enough charge. It needs to be replaced.
Over-Range Readings (Short Circuit)
Some multimeters might display an “OL” (Over Limit) or “1” (indicating an open circuit or infinite resistance) if the capacitor has an internal short. This also indicates a faulty capacitor that requires replacement.
Here’s a quick reference table for interpreting your capacitance readings:
| Capacitance Reading | Interpretation | Action Required |
|---|---|---|
| Within +/- 5% (or 10%) of rated µF | Good condition | Capacitor is likely functional; investigate other issues. |
| Significantly below rated µF | Weak/failing capacitor | Replace capacitor. |
| Zero or near zero µF | Dead capacitor | Replace capacitor. |
| “OL” (Over Limit) or abnormally high reading | Short-circuited capacitor | Replace capacitor. |
| Visibly swollen/leaking | Physically failed capacitor | Replace capacitor (no testing needed). |
Capacitor Replacement Tips (Briefly)
If your testing confirms a faulty capacitor, replacement is often a DIY task for those comfortable with basic electrical work, always adhering to safety. Ensure you purchase a replacement capacitor with the exact same µF rating and voltage rating as the original. Voltage can be higher, but never lower. Pay close attention to the wiring diagram on the AC unit’s service panel or take a clear picture of the wiring before disconnecting to ensure correct reinstallation.
Testing an air conditioner capacitor is a valuable skill for any homeowner looking to maintain their AC unit and troubleshoot common problems. By following the detailed steps for safe power disconnection, discharge, and accurate multimeter usage, you can effectively diagnose a faulty capacitor. This process not only empowers you to perform basic AC maintenance but also helps you understand a crucial component of your home’s cooling system, contributing to more efficient operation and potentially extending your unit’s lifespan.
Frequently Asked Questions
Why is it important to test an air conditioner capacitor?
Testing your AC capacitor helps diagnose common problems like your unit failing to start, weak airflow, or unusual humming noises. A failing capacitor is a frequent culprit for these issues and can lead to more serious component damage if left unaddressed.
How do I safely test an air conditioner capacitor with a multimeter?
First, always ensure the power to your AC unit is completely shut off at the breaker and carefully discharge the capacitor using an insulated screwdriver. Then, set your multimeter to the capacitance (µF) setting, connect the leads to the capacitor terminals, and compare the reading to the specified microfarad (µF) value on the capacitor label.
What tools are essential for testing an air conditioner capacitor?
The primary tool you’ll need is a multimeter with a capacitance (µF) setting. Additionally, a screwdriver with an insulated handle is crucial for safely discharging the capacitor before handling it, preventing electric shock.
What kind of readings indicate a good versus a bad air conditioner capacitor?
A good air conditioner capacitor will show a microfarad (µF) reading on your multimeter that is within +/- 5% of the value printed on its label. If the reading is significantly lower, fluctuating erratically, or the multimeter shows an “OL” (overload) or zero reading, the capacitor is likely bad and needs replacement.
What safety precautions should I take when testing an air conditioner capacitor?
Always turn off all power to the AC unit at the main breaker before touching any components. It is absolutely critical to discharge the capacitor using an insulated screwdriver before handling it, as it can store a dangerous electrical charge even when power is off.
Can I visually inspect an air conditioner capacitor for signs of failure?
Yes, visual inspection can sometimes reveal obvious signs of a bad capacitor. Look for bulging tops, leaking oil, or any signs of corrosion around the terminals. While visual cues are strong indicators, a multimeter test is always necessary for a definitive diagnosis.
As an Amazon Associate, I earn commission from qualifying purchases.


